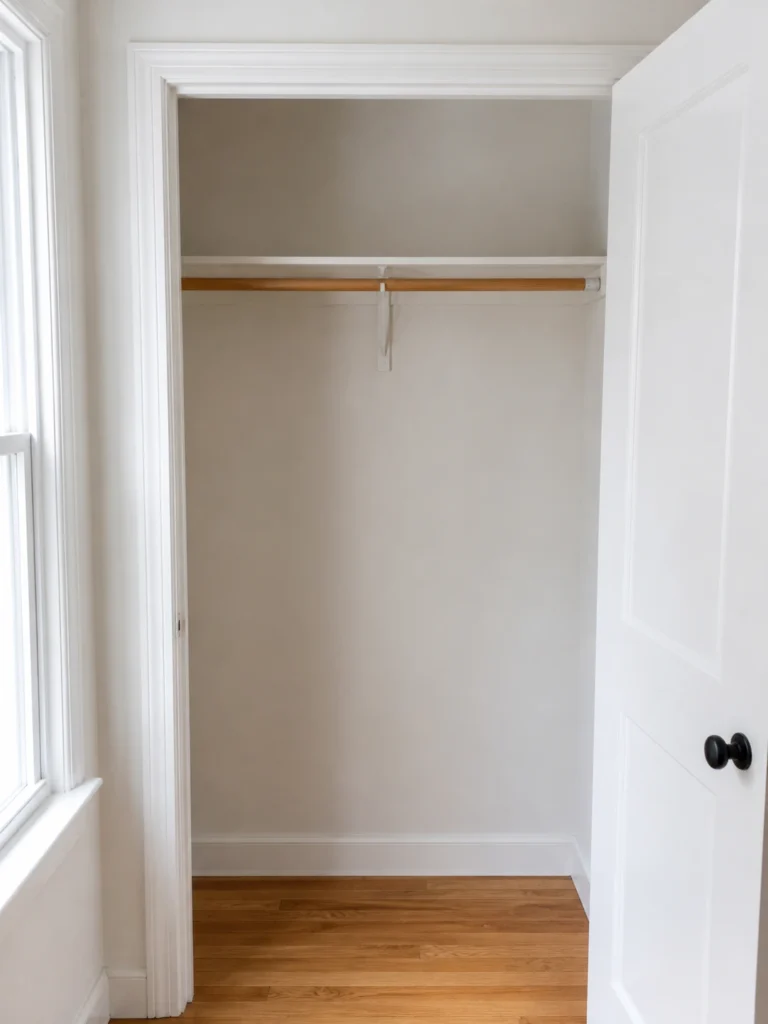
You open the closet door. There it is — one lonely rod, four bare walls, and a pile of clothes on the floor that seems to grow back overnight no matter what you do. If you are renting, or if your bedroom simply came without the luxury of built-in shelving, you already know that most closet organization advice assumes you have a system to work with. This guide does not make that assumption.
Below is a complete, step-by-step system for how to organize a small bedroom closet with no built-ins — one that works in awkward rental closets, narrow alcoves, and even that odd-shaped nook that barely qualifies as a closet at all. No drilling into walls required. No expensive custom units. Just a practical method that you can set up in a weekend and — more importantly — actually keep up with.
Why Built-In Closets Are Not the Only Option
Here is what most closet organization content gets wrong: it assumes you already have shelving, drawers, or custom cabinetry to work with. The advice becomes “add drawer dividers to your existing drawers” or “use your upper shelf for seasonal bins” — advice that is completely useless when your closet has nothing but a single hanging rod screwed into the wall.
The good news is that a closet without built-ins is not a broken closet. It is simply a blank canvas. The difference between a built-in system and a freestanding one is not function — it is permanence. Freestanding systems can be just as effective, just as spacious, and in many cases, far more flexible, because you can reconfigure them as your wardrobe and lifestyle change.
This guide works for any closet type: the standard hinged-door bedroom closet, a sliding-door wardrobe alcove, an open nook without a door, and even a deep cupboard that was never intended for clothes storage.
Step 1 — Measure Your Closet Before Buying Anything
This is the step that most people skip. They buy a garment rack, get it home, and discover it is six inches too wide to fit through the closet door. Or they purchase a hanging organiser that is two feet taller than the rod allows. Measuring first costs nothing and saves a significant amount of frustration.
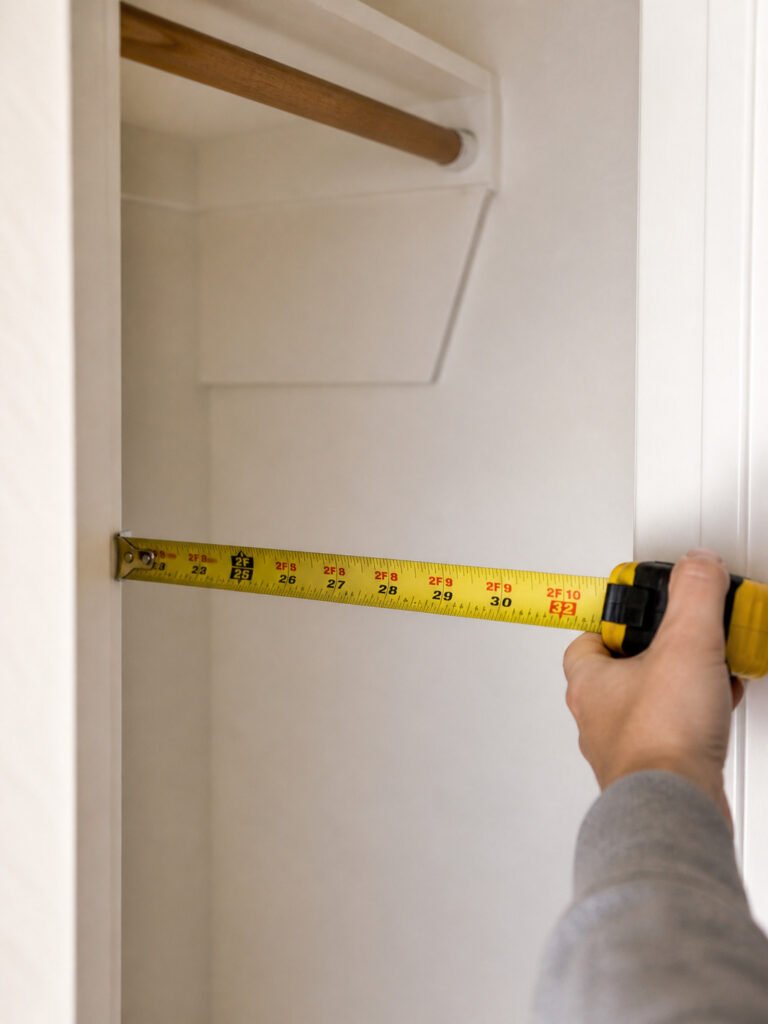
Here is what to measure and note down:
- Width: Measure wall to wall at the widest point, and again at the narrowest point. Old rental closets are rarely perfectly square.
- Height: Measure from the floor to the rod. Then measure from the rod to the ceiling — this tells you how much vertical space you currently have above the hanging zone.
- Depth: Measure front to back. Standard closet depth is 24 inches, but many older homes have shallower closets that will not accommodate deep cube units.
- Door swing or track: If the closet has a hinged door, measure the arc of the swing. Anything placed too close to the door will block it from opening fully.
- Baseboard depth: If your closet has a baseboard running along the back wall, measure its depth — it affects how far back any freestanding unit can actually sit flat against the wall.
Write these measurements in a notes app on your phone before you shop. If you are buying online, check the product dimensions against your closet width and factor in whether the unit needs to be angled in through the door.
Step 2 — Declutter First, Organise Second
This is not optional. Attempting to organise a closet without decluttering first is like making your bed without straightening the sheets — it looks better for about 45 minutes and then collapses entirely.
Remove every single item from the closet completely. Place everything on the bed. Now sort into three categories:
- Keep in this closet: Current-season items you wear regularly.
- Donate or sell: Anything you have not worn in 12 months that still has life in it.
- Store elsewhere: Off-season items that do not need to take up prime closet space all year.
The seasonal rotation system is particularly effective in small bedroom closets. Store winter coats, heavy jumpers, and off-season shoes in vacuum storage bags under the bed or in an under-stair cupboard. This alone can free up 30–40% of your closet space without adding a single new product.
Once you have decluttered, resist the urge to put things back in immediately. Lay out what you are keeping and categorise it further: hanging items, folded items, shoes, and accessories. This categorisation determines which freestanding system you need — which brings us to Step 3.
Step 3 — Choose the Right Freestanding System for Your Space
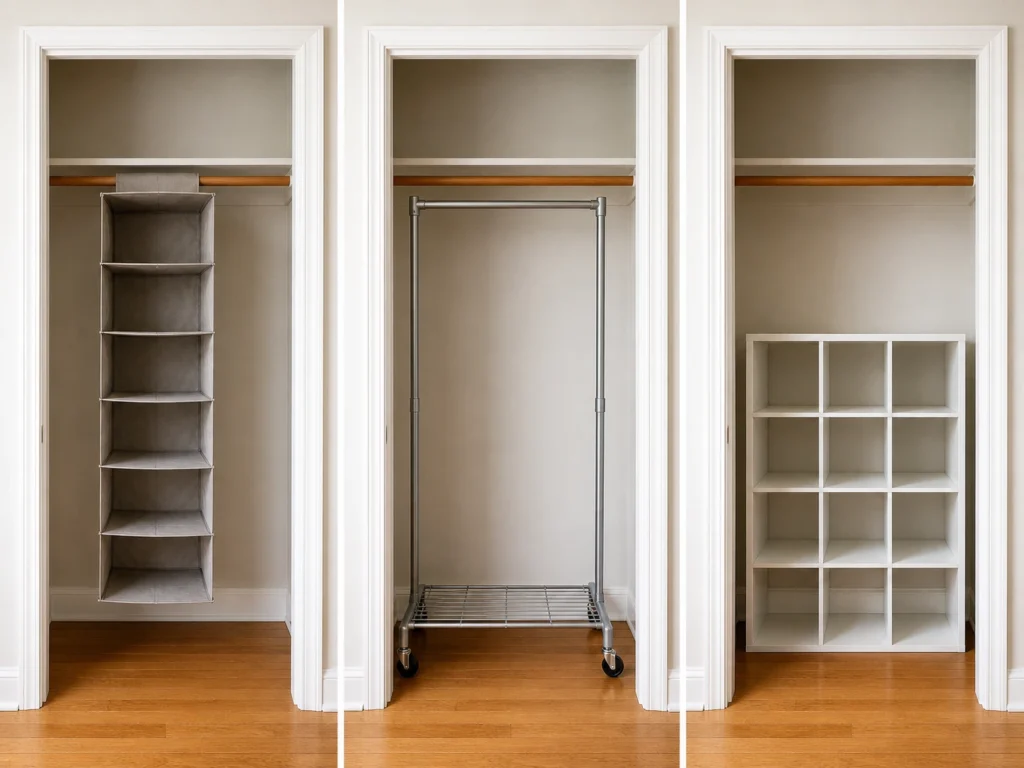
Not all freestanding closet systems are created equal, and the right choice depends entirely on your measurements and what you are storing. There are three main types to consider.
Type 1: Hanging Fabric Organisers
These clip onto your existing rod and create multiple shelving compartments below the hanging zone. They are the cheapest option (typically $15–$40) and require no assembly. The downside is that they are not rigid, which means they tend to sag over time under heavy items like jumpers and denim. Best for: lightweight folded items, accessories, and shoes.
Type 2: Metal Garment Racks
Freestanding metal garment racks stand independently of the closet walls and can be placed inside or directly outside the closet. They provide double hanging functionality when you choose a two-tier model. Most can be assembled without tools in under 20 minutes. Cost: $30–$120 depending on size and material. Best for: hanging-heavy wardrobes, renters who cannot attach anything to walls, and open nook closets.
Type 3: Modular Cube Systems
Cube shelving units provide the closest substitute to a built-in look. You can stack them, place them side by side, and add fabric drawers or solid doors to individual cubes. They require more floor space and more setup time, but they offer the most storage flexibility of the three types. Cost: $50–$200 depending on the number of cubes. Best for: closets with enough depth (minimum 14–16 inches) and height to accommodate a stacked unit.
| System Type | Approximate Cost | Space Needed | Best For |
|---|---|---|---|
| Hanging Fabric Organiser | $15–$40 | Minimal | Lightweight folded items |
| Metal Garment Rack | $30–$120 | Medium | Hanging-heavy wardrobes |
| Modular Cube Shelf | $50–$200 | Most space | Maximum storage flexibility |
Step 4 — Maximise Vertical Space With Shelf Dividers and Over-Door Organisers
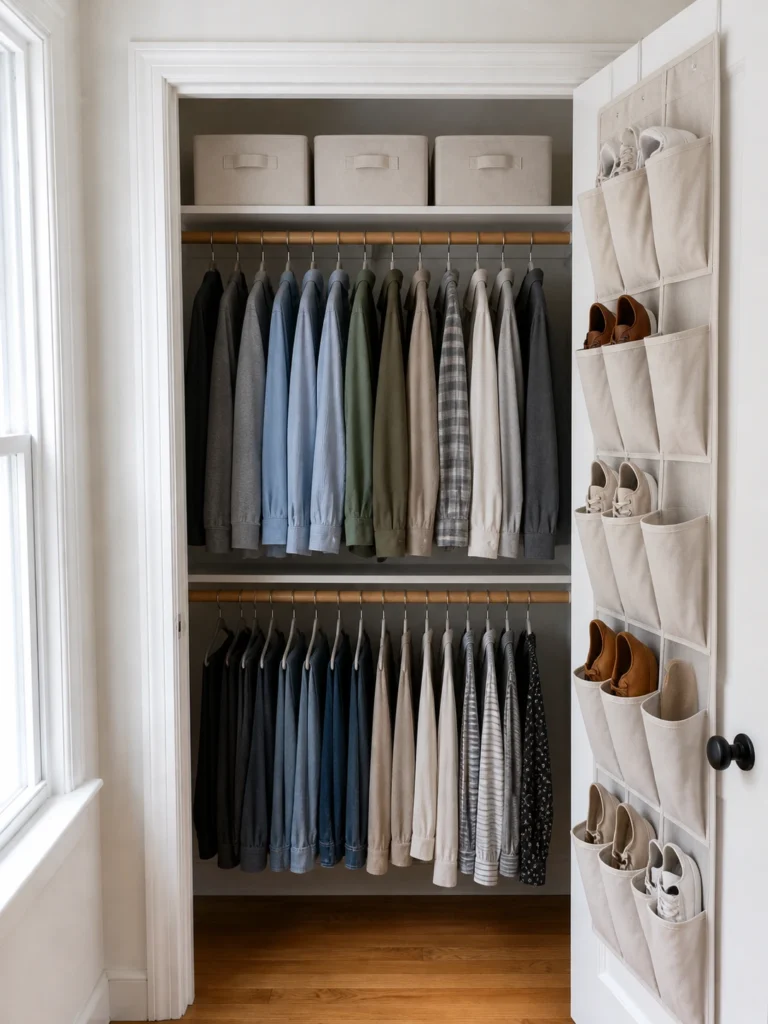
The most wasted space in a closet without built-ins is almost always vertical. Look up at the zone between the rod and the ceiling — in most standard closets, this is 12–18 inches of completely empty space. That is enough room for a full row of folded jumpers, shoe boxes, or seasonal storage bins.
Here is how to claim it without installing a single shelf:
Add a second hanging rod. A portable second rod that hooks onto your existing rod and hangs below it effectively doubles your hanging capacity for shorter items like folded shirts, jackets, and trousers. Look for a chrome or brushed metal version for durability.
Use clear stackable bins on the top shelf zone. If your closet has even a few inches above the rod, a stackable clear bin holds folded T-shirts, workout clothes, or accessories. Clear bins mean you can see the contents without pulling everything down.
Install an over-door shoe organiser. The inside of the closet door is genuinely one of the most underused surfaces in most bedrooms. A fabric or clear-pocket over-door organiser holds not just shoes, but hair accessories, belts, scarves, small bags, and folded leggings. No drilling required — these hang directly over the door panel.
Use shelf dividers on any existing or added surfaces. These clip onto the edge of a shelf and prevent folded clothing piles from toppling sideways. They are inexpensive ($10–$20 for a set of four) and immediately make folded zones look intentional rather than precarious.
Step 5 — The Folding and Grouping System That Makes It Stay Organised
The most common reason a closet falls back into chaos within two weeks is not a lack of storage — it is a lack of a retrieval system. When you have to pull an entire folded pile apart to find one T-shirt, the pile never gets rebuilt correctly. The solution is file folding.
File folding means folding each item into a compact rectangle and standing it upright in a drawer or bin rather than stacking it flat. This way, you see every item at a glance and can pull one out without disturbing the others. It takes slightly longer to fold this way initially, but it saves significant time every single day at the getting-dressed stage.
Group by category, not by colour. A colour-organised closet looks beautiful in photographs but is impractical to maintain. Group by type instead: all trousers together, all tops together, all knitwear together. Within each category, you can arrange by colour if you like — but the category grouping is the functional layer.
Seasonal rotation with vacuum storage bags. For items not in active use — heavy winter coats, chunky knitwear, summer dresses in January — vacuum compression bags reduce their volume by up to 80%. These bags fit under the bed, on a high shelf, or in a suitcase in a spare room. Rotating them in and out at the change of season keeps your active closet reserved for what you are actually wearing right now.
Apply the one-in, one-out rule. Small closets do not have room for wardrobe expansion. Every time a new item enters the closet, one item should leave — either to the donate pile or to a different storage area. This single rule, maintained consistently, prevents the declutter cycle from having to start over every six months.
Common Mistakes to Avoid When Organising a Small Closet
Even with the best intentions and the right products, these four mistakes will undermine a small closet organisation system:
Buying organisers before measuring. As covered in Step 1, this is the most expensive mistake you can make. A fabric hanging organiser that is too long will fold at the bottom and become a crumpled mess. A cube unit that is too wide simply will not fit through the door.
Using the floor as permanent storage. In a small closet, the floor should be used only for shoes in a structured organiser — never for bags, loose items, or piles of anything. Floor clutter is the fastest way to make a small space feel completely unmanageable.
Over-categorising with too many small bins. It is tempting to have a labelled bin for every micro-category of item. In a small closet, this approach creates confusion rather than clarity. Keep categories broad and bins large. The fewer containers you have to open to find something, the more likely you are to maintain the system.
Ignoring the door as storage space. The inside of a closet door adds the equivalent of a full shelf to your storage footprint. If you are not using it, you are leaving significant usable space completely empty.
Frequently Asked Questions
How do I organize a closet with no shelves?
Start with a freestanding system: a hanging fabric organiser clips onto your existing rod and creates multiple shelf zones, while a portable garment rack or modular cube unit works independently of the closet walls entirely. Add a second hanging rod for shorter items and use the over-door surface for shoes and accessories.
What is the best freestanding closet system for renters?
For renters, the best option is one that requires no drilling and leaves no wall damage. A two-tier metal garment rack or a modular cube shelf unit with fabric drawers are both fully freestanding. These offer a near-built-in look with no permanent installation required.
How do I maximize vertical space in a small bedroom closet?
Add a second hanging rod below the existing one for shorter garments, use clear stackable bins in the zone above the rod, install an over-door organiser on the inside of the closet door, and use shelf dividers to stabilise folded piles and prevent wasted lateral space.
How often should I declutter my bedroom closet?
A full declutter at each seasonal change — twice a year — is the practical minimum. However, applying the one-in, one-out rule consistently throughout the year reduces the amount of effort required at each seasonal sort.
Final Thoughts
Organising a small bedroom closet with no built-ins is entirely achievable — it simply requires a different approach than the built-in-forward advice that dominates most home organisation content. Measure before you buy, declutter before you organise, choose the right freestanding system for your specific space, claim every inch of vertical surface, and adopt a folding and grouping method that makes maintaining the system straightforward.
The result is a closet that functions as well as any custom built-in — and one that you can take with you when you move. Start with the measuring step this weekend, and the rest follows naturally.