Most outdoor kitchens start the same way. Someone buys a grill they love, positions it on the patio, realises there is nowhere to put anything down, adds a side table, realises the table is the wrong height, adds a cabinet, realises the cabinet does not weather well, and ends up two years later with an awkward collection of mismatched outdoor furniture that technically functions as a kitchen but is frustrating to use every single time.
The problem is not the individual products. The problem is that each purchase was made in response to the last one rather than according to a plan that existed before any money was spent. Outdoor kitchens that work — that feel spacious, intuitive, and genuinely enjoyable to cook and entertain in — are almost always the result of layout planning that happened before the first purchase, not after.
This guide is for anyone at the beginning of that process. It covers the four layout types and how to choose between them, the work triangle principle applied to outdoor cooking, the five zones every outdoor kitchen should include, how to measure your space correctly, which materials actually survive outdoors, what each zone will realistically cost, and the seven planning mistakes that are expensive to fix once building has started. Work through it before you buy anything, and the result will be an outdoor kitchen that functions as well as it looks.
The 4 Layout Types and Which One Fits Your Space
Outdoor kitchen layouts follow the same four fundamental configurations as indoor kitchens, adapted for open-air conditions, varying space sizes, and the different relationship between cooking and entertaining that outdoor cooking involves. Choosing the right layout for your specific outdoor space is the first and most important planning decision you will make.
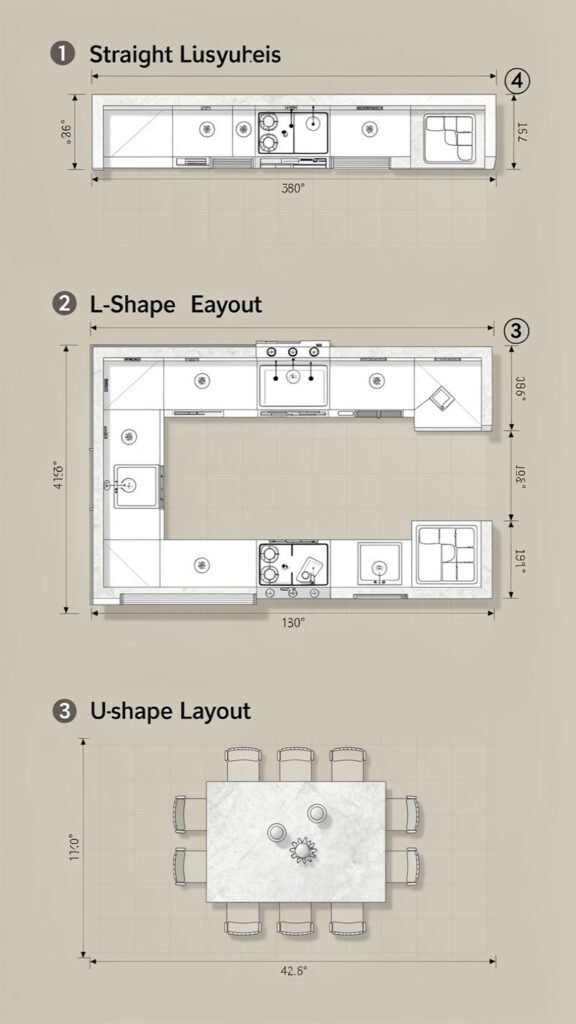
Layout Type 1: Straight or Linear
A straight layout runs all cooking, prep, and storage elements along a single line against a wall, fence, or the exterior of the house. It is the most space-efficient configuration and works well in narrow outdoor spaces, on balconies, on side passages, and against boundary fences where depth is limited but length is available.
The advantage of a linear layout is its simplicity — everything is accessible from a single standing position, and the layout requires the least total square footage of any configuration. The limitation is that it provides no social interaction space around the cooking area. The cook faces the wall and the guests are behind them, which works for casual family cooking but less well for entertaining.
A linear layout works best when the outdoor space is narrow — under 10 feet wide — or when the kitchen will be used primarily for functional cooking rather than as a social centrepiece.
Layout Type 2: L-Shape
An L-shape layout runs along two adjacent walls or surfaces, creating a corner configuration that is the most popular and versatile outdoor kitchen layout for medium-sized outdoor spaces. It separates the cooking zone from the prep or serving zone naturally, provides significantly more counter space than a linear layout, and opens up the front face of the kitchen toward the seating or entertaining area.
The L-shape is the layout most recommended for first-time outdoor kitchen builders because it scales well — it works in relatively modest spaces but can also accommodate a full-featured kitchen as the budget and space allow — and because it creates a natural social dynamic where the cook faces the gathering area rather than a wall.
An L-shape layout works best in outdoor spaces between 12 and 20 feet in their shorter dimension, with the two arms of the L running along two perpendicular surfaces such as the house wall and a side boundary, or along two sides of a patio area.
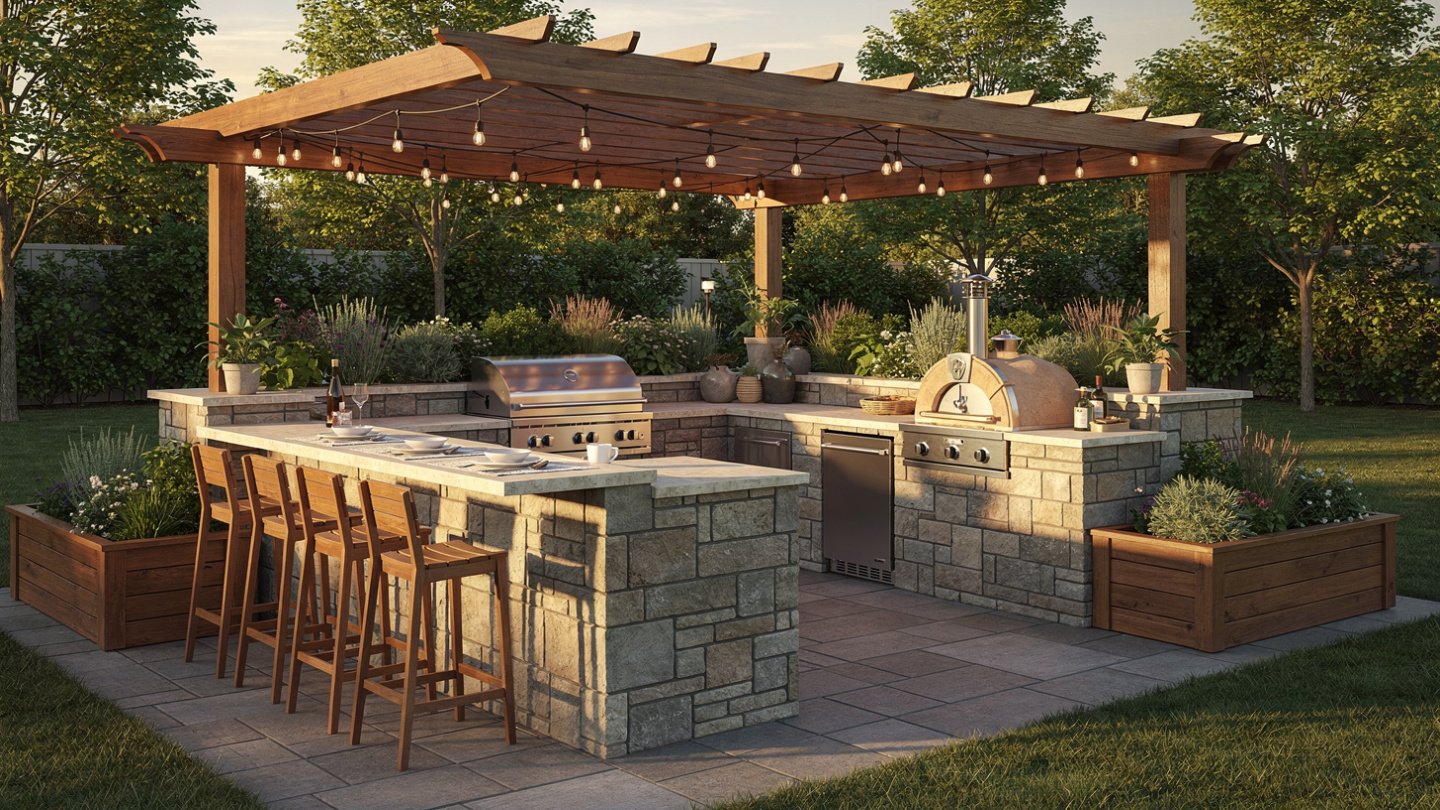
Layout Type 3: U-Shape
A U-shape layout wraps around three sides of the cooking area, creating the maximum counter space and storage capacity of any outdoor kitchen configuration. It is best suited to large entertaining areas where outdoor cooking is a primary feature of the space and where multiple people may be cooking or prepping simultaneously.
The U-shape requires the most space — the open face of the U should be at least 60 inches wide to allow comfortable movement in and out of the cooking area — and the highest construction budget. It is not a practical starting point for most first-time outdoor kitchen builders, but it is the configuration to plan toward if the long-term vision is a fully featured outdoor entertaining kitchen.
Layout Type 4: Island
An island layout places the cooking and prep surfaces in a freestanding unit at the centre of the outdoor space, accessible from all four sides. It works best in large, open patio areas where the kitchen is intended to be the visual and social centrepiece of the outdoor space — guests can gather around all sides of the island, and the cook has access to all zones without moving around a fixed corner.
Islands are the most dramatic outdoor kitchen layout visually and often the most social, but they require significant open space on all four sides — a minimum of 42 inches of clearance on each side for comfortable movement — and they must be positioned away from any boundary or structure, which limits their placement options considerably.
The Work Triangle Rule: It Applies Outdoors Too
The kitchen work triangle is a principle developed for indoor kitchen design that identifies the three most-used work stations — the cooking surface, the preparation surface, and the cleaning station — and recommends that they be arranged so that no leg of the triangle between them exceeds 9 feet in length. The goal is to minimise the distance a cook travels between the three most-used points during food preparation.
The same principle applies directly to outdoor kitchens, with one important adaptation: in an outdoor kitchen, the three points of the triangle are typically the grill, the prep counter, and the sink or cleaning area. If your outdoor kitchen does not include a permanent sink, the cleaning station can be represented by the nearest access point to water — often a door back into the indoor kitchen.
The reason randomly placed grills are frustrating to cook on is almost always a work triangle problem. If the grill is at one end of the patio, the prep counter is a side table 15 feet away, and the nearest water source is inside the house, the cook is constantly walking back and forth between three widely separated points. Every dish prepared involves significantly more movement than it should, which makes cooking more tiring, less efficient, and less enjoyable.
When planning your outdoor kitchen layout, sketch the triangle between the grill, prep counter, and cleaning station before finalising any positions. Aim for no leg of the triangle to exceed 9 feet. If the layout requires any leg to be longer than this, reconsider the positioning of the elements involved before committing to construction.
The 5 Zones Every Outdoor Kitchen Should Have
A functional outdoor kitchen is not simply a grill on a patio. It is a collection of five distinct zones, each serving a specific purpose in the cooking and entertaining sequence. Understanding which zones are non-negotiable and which are optional will help you prioritise your planning and budget accurately.
Zone 1: Cooking
The cooking zone is the non-negotiable core of any outdoor kitchen. It contains the primary heat source — a built-in gas grill, a charcoal grill, a kamado cooker, a smoker, or a pizza oven — and defines the character and capability of the entire kitchen. The cooking zone should be positioned first in any layout plan, with all other zones arranged in relation to it.
When positioning the cooking zone, account for prevailing wind direction in your outdoor space. The cooking zone should be oriented so that the prevailing wind carries smoke away from the seating area and away from the house. Getting this wrong is one of the most uncomfortable planning mistakes possible — a grill positioned so that smoke blows consistently into the seating area will be avoided rather than used.
Zone 2: Preparation
The prep zone is counter space — and specifically, counter space directly adjacent to the grill. The minimum practical prep counter is 24 inches on at least one side of the grill, and ideally 24 inches on both sides. This space is where raw food is staged before going on the grill and where cooked food rests before serving. Without adequate prep space directly beside the grill, every cooking session involves balancing plates on the edge of the grill, walking back and forth to a separate table, or running inside to the indoor kitchen — all of which defeat the purpose of an outdoor kitchen.
More counter space is always better in an outdoor kitchen. If you are uncertain how much prep space to include, plan for more than you think you need. Counter space is the element most consistently underestimated by first-time outdoor kitchen builders.
Zone 3: Storage
The storage zone — cabinets, drawers, or a cart — holds the tools, utensils, plates, condiments, and supplies needed for outdoor cooking. Storage positioned within the outdoor kitchen eliminates the need to go indoors for equipment during cooking, which is one of the primary frustrations of a poorly planned outdoor cooking space.
At a minimum, the storage zone should accommodate: grill tools, a set of outdoor plates and utensils, condiments and seasonings, paper towels, and a fire extinguisher. Any outdoor kitchen that requires a trip indoors for any of these items is under-stored.
Zone 4: Serving
The serving zone is a counter or bar ledge from which food is distributed to guests — either directly to hands, to plates, or to a dining table nearby. In an L-shape or U-shape layout, the serving zone is often the arm of the layout furthest from the grill, positioned so that guests can access it without entering the active cooking area. In an island layout, the serving zone is typically the side of the island facing the seating area.
The serving zone can double as a bar in layouts where outdoor entertaining involves drinks service. A section of counter at bar height — 42 inches rather than the standard 36-inch counter height — with bar stools on the guest side creates a social gathering point that keeps guests engaged with the cook without putting them in the path of the cooking activity.
Zone 5: Cleaning
A dedicated cleaning zone — ideally a stainless steel outdoor sink connected to a water supply — completes the functional circuit of an outdoor kitchen. Without a sink, every element of food preparation that involves water requires a trip inside: rinsing vegetables, filling pots, washing hands between handling raw and cooked food, and cleaning up after cooking. Each of these trips adds friction to the cooking process and reduces the enjoyment of the outdoor kitchen significantly.
A permanent plumbed sink is the ideal. Where plumbing to the outdoor area is not feasible, a portable sink connected to a garden hose is a practical alternative that provides most of the functional benefits of a permanent installation at a fraction of the cost and complexity. Even a simple hose bib positioned within the kitchen footprint is a meaningful improvement over no water access at all.
How to Measure Your Space Before Designing the Layout
Accurate measurement of the outdoor space is the foundation of a layout plan that actually works. Measurements taken at this stage prevent the two most common and expensive outdoor kitchen planning failures: running out of space mid-build and discovering that utilities cannot reach the intended positions of the grill, sink, or refrigerator.
Step 1: Measure the total available area. Measure the full length and width of the outdoor space in which the kitchen will be located. Note the positions of any fixed features — doors, windows, existing structures, drainage points, steps, and changes in surface level — that will constrain the layout.
Step 2: Identify and mark all utility access points. Mark the positions of any existing gas connections, electrical outlets, water supply points, and drainage. The positions of these utilities will significantly constrain where the cooking zone, cleaning zone, and any refrigeration can be located. Moving utilities — extending a gas line, running electrical conduit, or routing new plumbing — adds cost and complexity to any project. Working within the existing utility positions where possible is always the more practical approach.
Step 3: Plan for traffic flow. The pathways through and around the outdoor kitchen must be wide enough for safe and comfortable movement. The minimum clearance between two facing surfaces — such as the kitchen counter and an outdoor dining table — is 42 inches for one person working and 48 inches for two people to pass comfortably. Mark these clearance zones on your measurements before finalising any layout dimensions.
Step 4: Account for the door swing and indoor access. If the outdoor kitchen is adjacent to an exterior door, ensure that the door can open fully without being blocked by any kitchen element. The arc of a standard exterior door swing is typically 36 inches — any kitchen element within this arc will block the door.
Step 5: Consider shade and sun exposure. Note the direction of prevailing sun exposure in your outdoor space at the times of day when the kitchen is most likely to be used — typically late afternoon and evening for a cooking and entertaining kitchen. An outdoor kitchen positioned in full afternoon sun will be uncomfortable to cook in during summer. Where shade cannot be provided by existing structures or trees, overhead shade — a pergola, a sail shade, or a retractable awning — should be factored into the plan from the beginning rather than added as an afterthought.
Materials That Actually Survive Outdoors
Material selection for an outdoor kitchen is not an aesthetic preference — it is a structural decision with direct consequences for how long the kitchen lasts and how much maintenance it requires. Many materials that are appropriate for indoor kitchens will deteriorate rapidly when exposed to weather, temperature variation, humidity, and UV light.
Countertop Materials
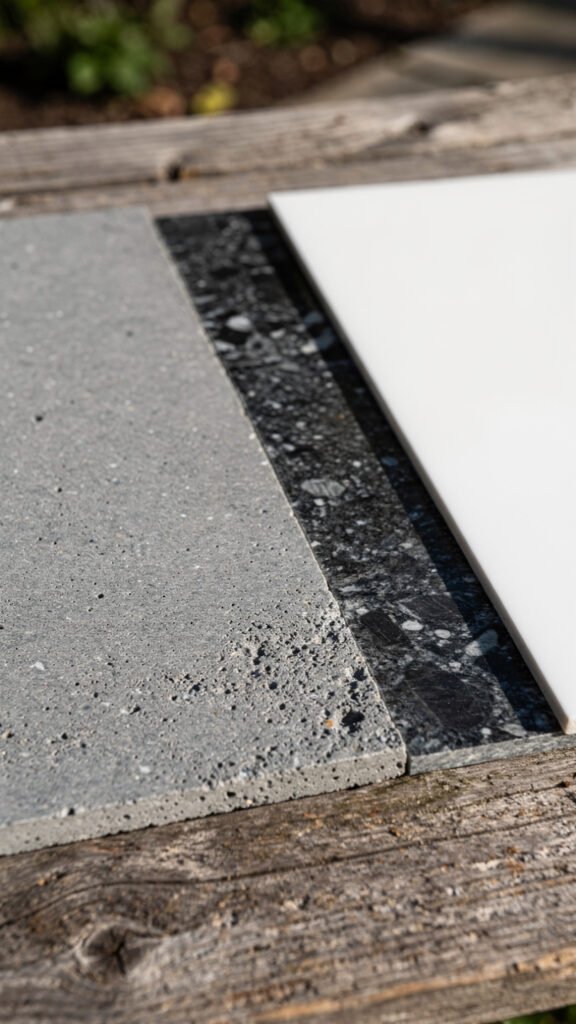
Granite: One of the most durable outdoor countertop materials available. Granite is heat-resistant, scratch-resistant, and tolerates weather variation well when properly sealed. It requires resealing periodically — typically every one to two years — but is otherwise low-maintenance. It is a strong choice for any climate.
Porcelain tile: A cost-effective and highly durable option. Porcelain is frost-resistant, UV-stable, and requires minimal maintenance. Large-format porcelain tiles create a clean, contemporary surface that wears well in outdoor conditions. Grout lines should be sealed and maintained to prevent water ingress in freezing climates.
Concrete: Extremely durable and highly customisable in terms of colour and finish. Poured or pre-cast concrete countertops require sealing to prevent staining and should be resealed periodically. They are heavy, which makes them well-suited to permanent outdoor kitchen installations.
Avoid wood and laminate outdoors. Both materials are vulnerable to moisture, UV degradation, and temperature cycling. Wood will warp, crack, and rot when exposed to outdoor conditions without intensive maintenance. Laminate will delaminate. Neither is an appropriate outdoor countertop material regardless of how it is sealed or treated.
Cabinet Materials
Marine-grade polymer: The highest-performing cabinet material for outdoor use. Marine-grade polymer is completely waterproof, UV-stable, rot-proof, and impervious to insects. It does not require painting or sealing and will not warp, crack, or corrode. It is the material of choice for coastal environments and high-humidity climates.
Stainless steel: Durable, hygienic, and weather-resistant. Stainless steel cabinets and drawer units are a strong choice for any outdoor kitchen but require periodic cleaning to prevent surface oxidation in coastal or high-humidity environments. Grade 304 stainless steel is appropriate for most inland environments; grade 316 is recommended for coastal locations.
Treated concrete block or masonry: A permanent and extremely durable cabinet substrate when rendered and sealed correctly. Masonry outdoor kitchen structures have indefinite lifespans when properly built and finished, and they provide a stable base for any countertop material. They are the most labour-intensive construction approach but offer the best long-term durability and design flexibility.
Avoid standard interior wood cabinetry outdoors. Even pressure-treated or painted wood cabinet carcasses will deteriorate within a few seasons when exposed to outdoor conditions. Wood is appropriate for decorative elements of an outdoor kitchen — a pergola overhead, a cladding finish on a masonry structure — but not for cabinet carcasses that are in direct contact with weather.
The Budget Planning Breakdown: What Each Zone Will Actually Cost
Budget transparency is one of the most useful things any outdoor kitchen planning guide can provide, because the gap between what people expect to spend and what outdoor kitchens actually cost is consistently significant. The figures below are approximate ranges based on mid-market materials and professional installation in most regions. Significant variation above and below these ranges is possible depending on location, material choices, and whether the construction is DIY or contractor-built.
| Configuration | Approximate Cost Range | What Is Included |
|---|---|---|
| Basic grill station — linear layout, grill plus minimal counter space, no sink | $500 – $1,500 | Entry-level built-in grill, basic countertop surface, minimal storage |
| Mid-range L-shape — grill, prep counter, storage cabinets, portable or plumbed sink | $3,000 – $8,000 | Mid-range grill, durable countertop material, weather-resistant cabinets, basic sink |
| Full L-shape or U-shape — grill, smoker or pizza oven, full counter space, sink, refrigerator, storage | $10,000 – $25,000 | Premium grill and secondary cooking appliance, granite or porcelain countertop, marine-grade or masonry cabinets, plumbed sink, outdoor refrigerator |
| Full island with premium finishes and complete appliance suite | $25,000 – $50,000+ | Built-in premium grill, pizza oven, smoker, full refrigeration, ice maker, plumbed sink, premium countertop, masonry or stainless steel cabinets, overhead structure |
Where to save: Cabinet material is the area of greatest cost flexibility. Marine-grade polymer cabinets perform as well as stainless steel in most environments at a lower cost. Countertop material is also an area where porcelain tile offers near-equivalent performance to granite at a significantly lower price point.
Where not to save: The grill is not an area for cost-cutting. An underpowered or poorly built grill is the most used and most important component of an outdoor kitchen — replacing it because it fails prematurely costs more than buying a quality unit at the outset. Similarly, countertop material directly affects how the kitchen holds up to years of outdoor use — the difference in longevity between an appropriate outdoor material and an inappropriate one is significant.
7 Planning Mistakes That Are Expensive to Fix Later
The following mistakes are consistently cited by outdoor kitchen builders as the ones they most regret — the decisions that seemed minor during planning but proved costly or frustrating once the kitchen was built and in use.
Mistake 1: Not leaving enough counter space beside the grill. The most common functional complaint about built outdoor kitchens is insufficient prep counter space directly adjacent to the grill. Plan for a minimum of 24 inches on each side. If budget or space forces a choice between the two sides, prioritise the side from which you naturally reach for food while cooking.
Mistake 2: Ignoring prevailing wind direction. A grill positioned so that smoke blows consistently toward the seating area or into the house will be repositioned in your mind every time you use it, even when it cannot be physically moved. Check the prevailing wind direction in your outdoor space across multiple days before finalising the grill position.
Mistake 3: No overhead shade planning. An outdoor kitchen without shade in a sunny climate will be underused during the hottest parts of the day. Planning for overhead shade — a pergola, a sail shade, a patio cover — from the beginning allows it to be integrated into the kitchen design rather than added as a retrofit. Retrofitting shade structures around an existing kitchen is significantly more complicated and expensive than building them together.
Mistake 4: Skipping the utility pre-plumb. If there is any possibility that the outdoor kitchen will eventually include a sink, a gas appliance, an outdoor refrigerator, or electrical outlets, run the conduit, pipes, and gas lines during the initial construction even if the appliances are not being installed immediately. Running utilities through a completed outdoor kitchen structure is substantially more expensive and disruptive than including them during the build.
Mistake 5: Choosing the wrong materials for the climate. An outdoor kitchen built with materials appropriate for a mild coastal climate may fail rapidly in a climate with hard winters and freeze-thaw cycles. Research the specific weather resistance requirements for your climate — freeze resistance, UV resistance, humidity resistance, salt air resistance — and select materials accordingly. The climate is not negotiable; the materials should respond to it.
Mistake 6: No dedicated waste or rubbish area. A functional outdoor kitchen generates waste — food packaging, used napkins, cooking residue — that needs a designated disposal point within the kitchen footprint. An outdoor kitchen with no rubbish bin position planned in results in bags placed on the ground beside the grill, which is both unhygienic and visually poor. Plan a cabinet or designated space for a covered rubbish container from the beginning.
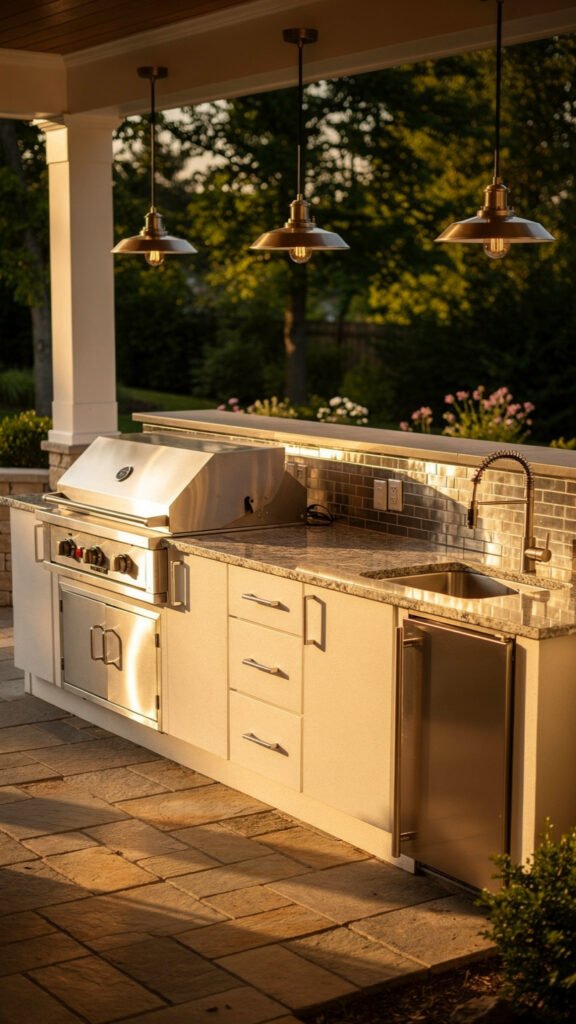
Mistake 7: Not planning for lighting. An outdoor kitchen used into the evening — which most entertaining kitchens are — requires dedicated task lighting over the cooking and prep zones and ambient lighting in the seating and serving areas. An outdoor kitchen built without integrated lighting provision will require surface-mounted lighting added after the fact, which is rarely as effective or as aesthetically integrated as lighting planned from the beginning.
Frequently Asked Questions
What is the minimum size for an outdoor kitchen?
A functional minimum outdoor kitchen — a grill with usable prep counter on at least one side and basic storage — requires approximately 8 to 10 linear feet of counter space and a depth of 24 to 30 inches. For an L-shape layout, the minimum footprint is roughly 8 feet on one arm and 6 feet on the other, with a minimum depth of 24 inches. Any smaller than this and the kitchen begins to lose the functional zones that make it genuinely useful rather than merely decorative.
Do I need planning permission for an outdoor kitchen?
Planning permission requirements for outdoor kitchens vary significantly by location, municipality, and the nature of the construction. Permanent masonry structures typically require a building permit in most jurisdictions. Gas line extensions and electrical work almost always require licensed contractors and inspections regardless of the structure type. Freestanding or modular outdoor kitchen units that are not permanently fixed to the ground typically do not require planning permission. Always check with your local authority before beginning any permanent outdoor construction.
What should I put in an outdoor kitchen?
At a minimum, a functional outdoor kitchen should include a grill, adequate prep counter space on at least one side of the grill, covered storage for tools and supplies, and access to water either through a plumbed sink or a hose connection. The most impactful additions beyond this minimum are an outdoor refrigerator for food and drinks storage, a side burner for sauces and sides, and a sink plumbed to a permanent water supply. Everything beyond these elements — pizza ovens, smokers, ice makers, outdoor dishwashers — adds capability and enjoyment but is not essential to a functional outdoor kitchen.
How much does a basic outdoor kitchen cost?
A basic outdoor kitchen — a built-in grill with a modest counter surface and minimal storage, in a simple linear or basic L-shape configuration — can be completed for between $500 and $1,500 using entry-level materials and a DIY approach. A mid-range L-shape with durable countertop materials, weather-resistant cabinets, a sink, and a quality grill typically costs between $3,000 and $8,000. A fully featured outdoor kitchen with premium appliances, quality countertops, and professional installation typically begins at $10,000 and increases significantly with the addition of secondary cooking appliances, refrigeration, and overhead structures.
Final Thoughts
The difference between an outdoor kitchen that gets used every week for years and one that becomes an expensive garden feature nobody quite knows how to use is almost always a planning difference. The kitchen that works was thought through before it was built. The layout was chosen for the specific space. The zones were designed around the actual cooking and entertaining behaviour of the people who use it. The utilities were run in the right places. The materials were chosen for the climate. The mistakes in this guide were avoided because they were known about before they could be made.
Use this guide as the framework for your planning process. Sketch your space, apply the layout types, plan the five zones, check your measurements, choose your materials for your climate, set a realistic budget, and work through the seven mistakes as a checklist before any construction begins. The outdoor kitchen that results from that process will be the one you actually enjoy using — and that is the only measure of success that matters.