Most articles about making a small bathroom feel larger assume you have a renovation budget, a landlord who permits structural changes, or at the very least the ability to retile, replumb, or knock through a wall. This guide makes none of those assumptions. Every method here works within the existing footprint of the bathroom, requires no permission from a landlord, and can be implemented over a weekend without a tradesperson involved.
A small bathroom does not feel small because it is small. It feels small because of clutter, blocked sightlines, poor light distribution, and visual fragmentation — all of which are solvable without touching a single wall. The following eight methods address each of these causes directly, in order of impact.
Why Small Bathrooms Feel Smaller Than They Are
Before addressing the solutions, it helps to understand the problem precisely. A bathroom that measures 50 square feet does not feel small because of the number — it feels small because of how the space reads visually. Three specific factors create the perception of smallness:
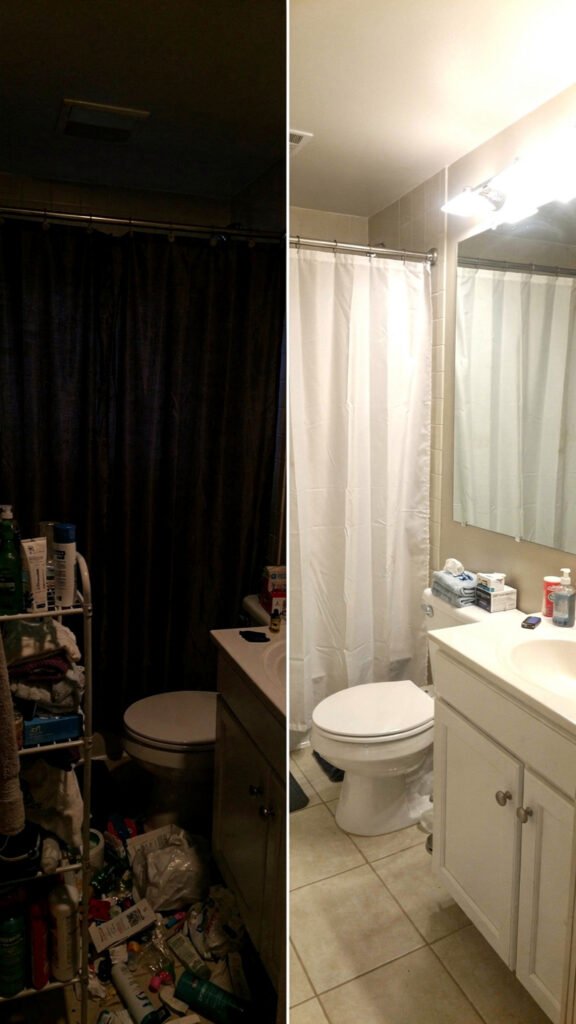
Clutter reduces perceived depth. Every object sitting on a vanity surface, every product lined up along the edge of the bath, every piece of clothing hanging on the back of the door occupies not just physical space but visual space. The eye reads a surface covered in objects as a boundary, and boundaries make rooms feel confined. A completely clear surface reads as open space, even when the physical dimensions have not changed at all.
Blocked sightlines shorten perceived distance. When the eye cannot travel to the far wall of a room without encountering an obstacle — a shower curtain, a freestanding cabinet, an opaque screen — the room feels smaller than it is. Any change that allows the eye to travel further before meeting a boundary increases the perceived size of the space.
Visual fragmentation multiplies boundaries. A bathroom with five different colours, four different textures, and three different storage styles reads as chaotic and small regardless of its actual dimensions. A bathroom with a cohesive colour palette and consistent materials reads as calm and spacious. The physical size has not changed — the visual noise has.
Every method below addresses one or more of these three factors.
Method 1 — Use a Larger Mirror Than You Think You Need
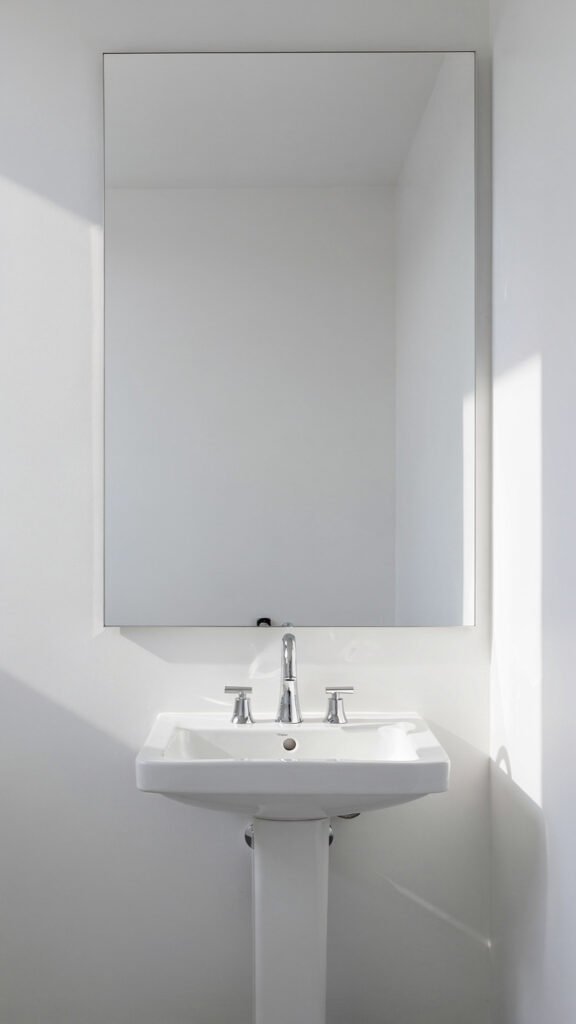
If you implement only one change from this entire guide, make it this one. A large mirror is the single highest-impact, lowest-cost intervention available in a small bathroom, and the reason it works so effectively is not just the reflection — it is the depth illusion.
A mirror that spans most of the wall above the vanity doubles the perceived depth of the bathroom. The eye reads the reflected space as real space, and the bathroom appears to extend beyond its actual rear wall. A small mirror above a vanity does not create this effect — it simply shows you your face. A large mirror, by contrast, opens up the room in a way that feels almost architectural.
The practical guidance is simple: go larger than your instinct tells you to. If you are standing in front of the vanity thinking a 24-inch mirror would look fine, buy the 36-inch one. If you are considering a 36-inch mirror, look at whether a 48-inch option is available. The larger the mirror relative to the wall, the more dramatic the depth effect.
For renters or those who cannot drill into walls, frameless adhesive mirrors and leaning mirrors are both viable options. A large, frameless, or thin-framed mirror is preferable to an ornate, heavily framed one in a small space — the simpler the frame, the less it competes with the reflection and the more the depth effect is preserved.
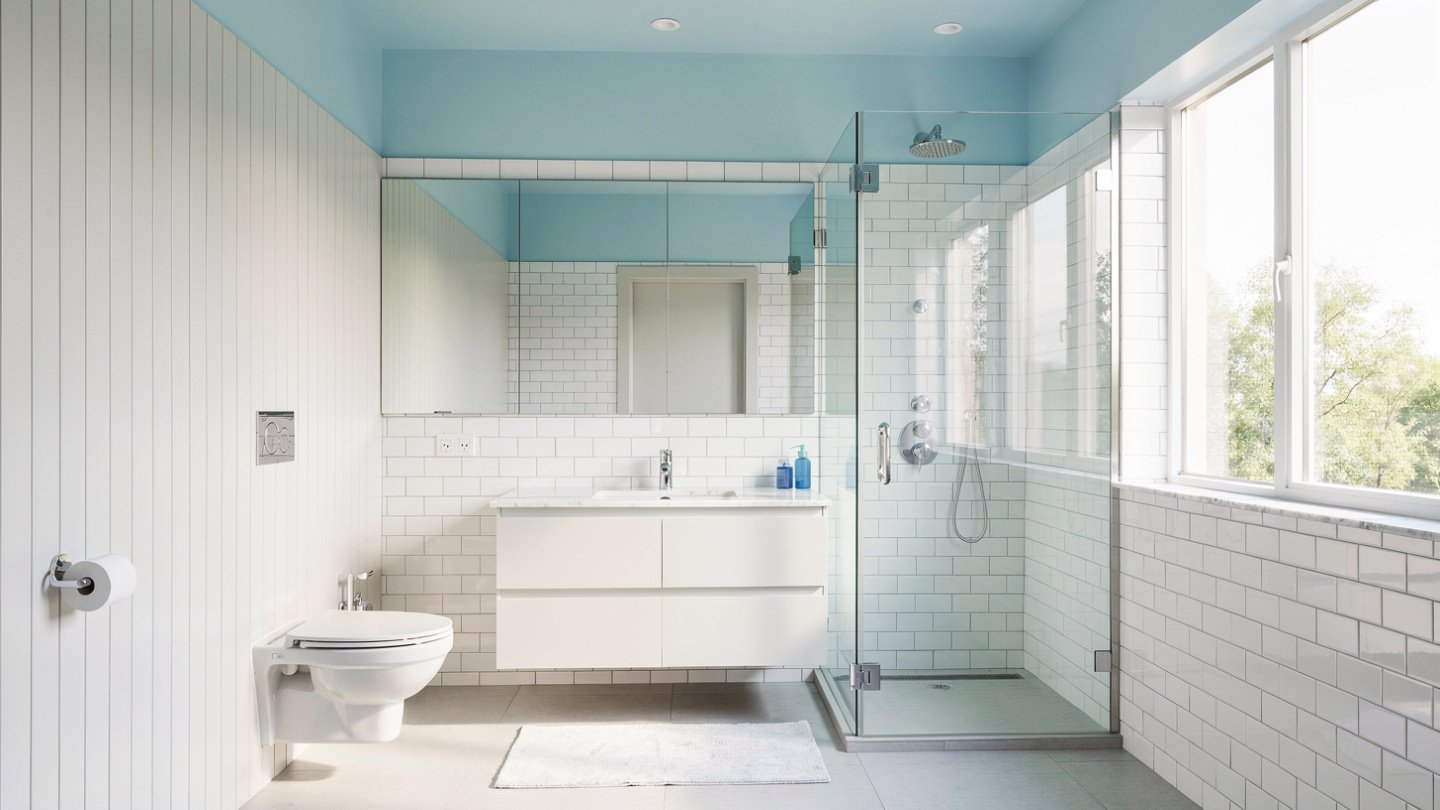
Method 2 — Replace Your Shower Curtain With a Clear One
A coloured, patterned, or opaque shower curtain creates an immediate visual wall across the bathroom. The eye hits it and stops. The back wall of the shower — which represents a significant portion of the room’s total depth — becomes completely invisible, and the bathroom effectively feels shrunken by whatever space sits behind the curtain.
A clear shower curtain removes this visual barrier entirely. The eye can travel through the curtain to the back wall of the shower, adding the full depth of the shower enclosure to the perceived size of the room. In a bathroom where the shower runs the full width of one wall, this single change can make a dramatic difference to how the space feels.
Clear shower curtains are widely available, inexpensive — typically under $20 — and require no tools to install beyond the existing curtain rail. If you find a fully clear curtain too clinical in appearance, a frosted or lightly textured clear option provides a slight visual softening while still allowing significantly more light and sightline depth than a fully opaque curtain.
Method 3 — Take Storage Off the Floor and Go Vertical
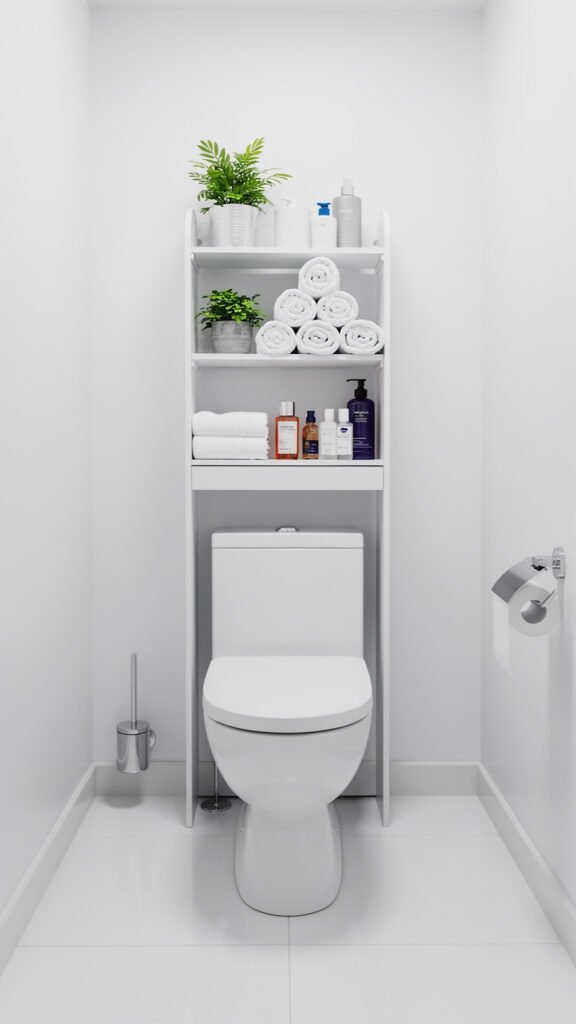
Floor clutter is the fastest way to make any small room feel claustrophobic, and bathrooms are particularly vulnerable because the floor space around the toilet, vanity, and bath tends to accumulate items that have no designated storage home. Shampoo bottles, bathroom scales, a spare toilet roll holder, a laundry basket — each of these items sitting on the floor reduces the amount of visible floor space, and visible floor space is one of the primary indicators the brain uses to assess room size.
The solution is to move as much storage as possible off the floor and onto the vertical surfaces of the room. Three approaches work particularly well in bathrooms where wall drilling is not an option:
Over-toilet storage towers. A freestanding over-toilet storage unit sits directly above the cistern and uses the vertical space above the toilet — which is almost always entirely wasted — to provide two or three shelves of storage. These units require no drilling, no tools, and no modification to the toilet. They are available in a range of materials from bamboo to painted MDF to powder-coated steel, and they clear the floor of whatever was previously sitting on it.
Tension pole shelving systems. A tension pole unit — two vertical poles tensioned between the floor and ceiling with adjustable shelves between them — provides significant storage capacity with zero wall attachment required. These work particularly well beside the vanity or in the corner of a bathroom, and the vertical lines of the poles draw the eye upward, contributing to a sense of ceiling height.
Over-door hanging organisers. The back of the bathroom door is consistently underused storage space. A fabric or plastic over-door organiser with multiple pockets holds toiletries, hair tools, cleaning products, and accessories without occupying any floor or shelf space whatsoever.
Method 4 — The Lighting Upgrade That Changes Everything
Most standard bathrooms are lit by a single overhead light source — typically a ceiling-mounted fixture positioned in the centre of the room. This is the least flattering and least effective lighting arrangement for a small bathroom. A single overhead source casts shadows downward onto the face, creates dark corners, and flattens the visual depth of the room by eliminating the variation in light and shadow that gives spaces their three-dimensional quality.
The upgrade that makes the most difference is adding a front-facing light source at face height — specifically, a light on either side of or directly above the mirror that illuminates the face from the front rather than from above. This is not just a vanity lighting preference — it dramatically changes how the entire bathroom reads. A well-lit mirror reflects more light back into the room, brightens dark corners, and makes the space feel larger by eliminating the shadows that create visual boundaries.
For renters and those without electrical access behind the mirror wall, the practical solutions are:
- A Hollywood-style LED mirror: A mirror with built-in front-facing bulbs around the perimeter. These are available in both plug-in and battery-operated versions, require no wiring, and provide even, diffused front-lighting at face height.
- Two small plug-in sconce-style lamps positioned on either side of the mirror: Any lamp that can be positioned at roughly face height and pointed toward the mirror will improve the lighting balance dramatically over a single overhead source.
- Battery-operated LED puck lights: Adhesive LED puck lights positioned along the underside of a shelf or cabinet above the mirror provide soft ambient uplighting that reduces the harshness of overhead-only illumination.
When choosing bulbs or LED sources for the bathroom, aim for a colour temperature of around 3,000K. This is a warm white that is flattering on skin tones and creates a sense of warmth and space without the yellow cast of lower colour temperatures or the cold clinical quality of higher ones.
Method 5 — Choose a Monochromatic Colour Scheme
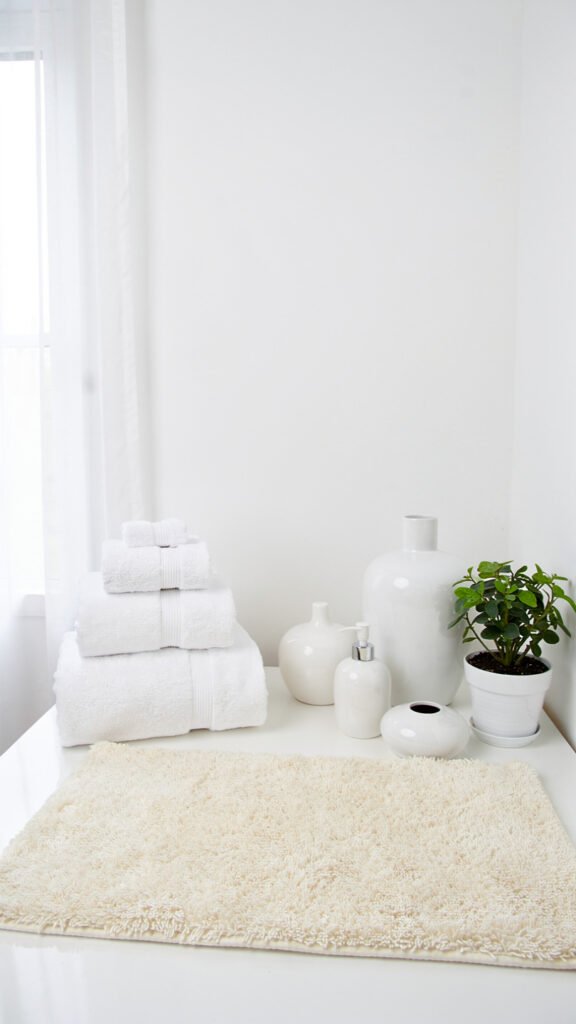
Visual fragmentation — the multiplication of boundaries through contrasting colours and textures — is one of the primary reasons small bathrooms feel smaller than they are. A bathroom with dark grey floor tiles, white walls, a navy shower curtain, brown wooden accessories, and a mint green bath mat is not a badly decorated bathroom — but it is a visually busy one, and visual busyness reads as smallness in a confined space.
A monochromatic colour scheme eliminates this fragmentation without requiring any structural change. When the floor, walls, towels, bath mat, accessories, and shower curtain all sit within the same colour family — even if they vary in tone and texture within that family — the eye travels through the room without interruption. The result is a bathroom that reads as a single, continuous space rather than a collection of competing elements.
The most effective monochromatic palettes for small bathrooms are those built around light, neutral base colours:
- All white and soft cream: The most expansive option, as white reflects the maximum amount of light and creates the strongest sense of openness. Vary the texture within the palette — matte tiles, fluffy towels, a woven bath mat, a ceramic soap dish — to prevent the scheme from feeling sterile.
- Warm sand and natural linen tones: A warmer alternative to pure white that feels more lived-in and relaxed while retaining the continuity that creates the spacious effect.
- Soft sage green throughout: An increasingly popular choice that works particularly well in bathrooms with natural light, creating an organic, botanical atmosphere within a cohesive palette.
You do not need to repaint or retile to achieve a monochromatic scheme. Towels, bath mats, shower curtains, soap dispensers, toothbrush holders, and storage baskets are all easily swapped, and collectively they make up a significant proportion of the colour in any bathroom.
Method 6 — Declutter the Vanity Surface Completely
Return to the first principle: clutter reduces perceived depth. Nowhere in the bathroom is this more visible than on the vanity surface. The average bathroom vanity accumulates between eight and fifteen individual products — moisturisers, serums, toothpaste tubes, electric toothbrushes, cotton bud containers, perfume bottles, hand creams — each of which occupies visual space and contributes to the sense of a room that has run out of room.
The goal is to reduce the vanity surface to three items maximum. Everything else moves into a drawer, under the sink, into a medicine cabinet, or into an over-door organiser. Three items on a vanity surface — one hand soap dispenser, one small plant, one item in daily use — reads as intentional and spacious. Fifteen items reads as overwhelmed and small.
The practical challenge is finding a home for everything that leaves the surface. A drawer organiser with individual compartments for each product category is the most effective solution for vanity units that have drawers. For pedestal sinks with no storage beneath, a basket placed directly under the sink — or an over-door organiser on the bathroom door — provides the storage capacity needed to clear the surface entirely.
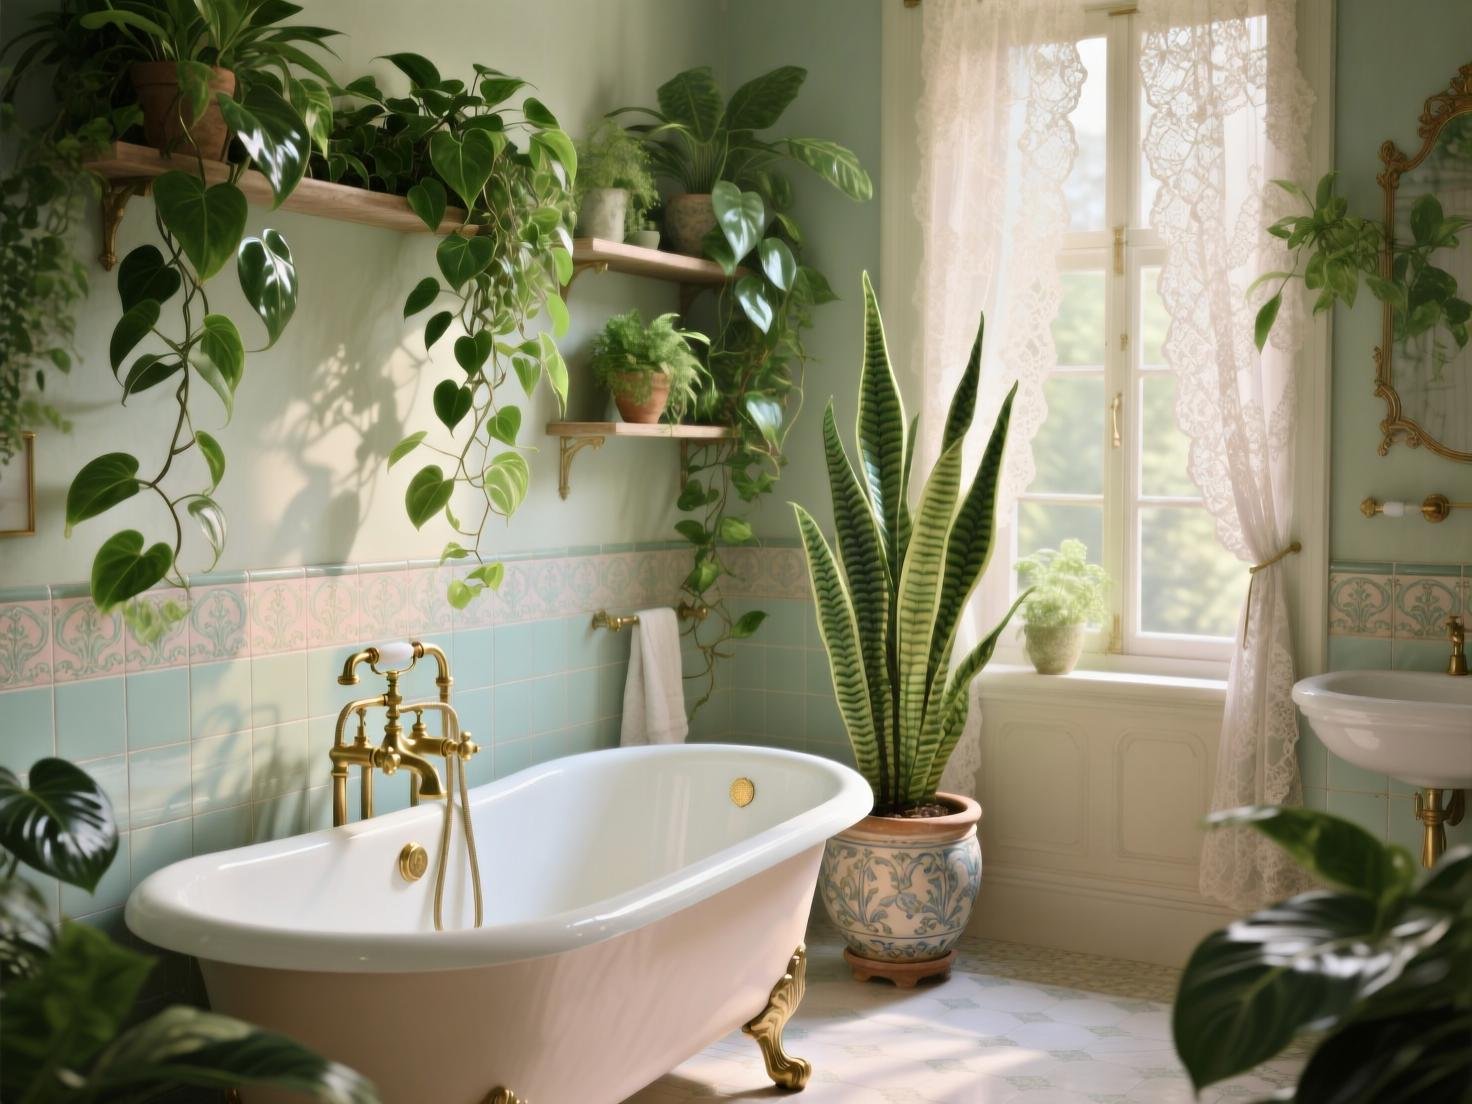
Method 7 — Add a Plant to Draw the Eye Upward
Vertical emphasis is one of the most effective visual tools for making a small space feel larger, and a tall, slender plant is one of the simplest ways to introduce it. When a plant reaches upward from the floor or a shelf, the eye follows the plant’s line of growth toward the ceiling, which draws attention to the full height of the room and makes that height feel like an asset rather than an afterthought.
The best plants for a small bathroom are those that tolerate the humidity and variable light conditions typical of the space:
- Snake plant (Sansevieria): Tall, architectural, and virtually indestructible in low-light conditions. The vertical lines of the leaves are particularly effective at creating upward visual movement.
- Bamboo: Fast-growing, humidity-tolerant, and naturally vertical in its growth habit. A single tall bamboo stem in a narrow vase takes up almost no floor space while adding significant height to the visual composition of the room.
- Pothos: If floor space is genuinely too limited for a floor plant, a trailing pothos on a high shelf or in a hanging planter draws the eye upward through its hanging vines and adds organic texture without occupying any surface or floor space.
If the bathroom has no natural light at all, dried botanicals — dried pampas grass, dried eucalyptus, dried lavender — provide the same vertical visual emphasis without any light requirements whatsoever.
Method 8 — Use Tension Rods for Extra Storage Without Drilling
Tension rods are one of the most underrated storage tools available to renters and those who cannot make permanent modifications to a bathroom. They install in seconds, require no tools, leave no marks, and are completely removable. Most people own one and use it for a shower curtain. Used strategically throughout the bathroom, tension rods multiply usable storage space significantly.
Under the sink: A tension rod installed horizontally inside the under-sink cabinet — at approximately the height of the spray trigger on a cleaning bottle — allows cleaning products to hang from their trigger handles rather than standing on the cabinet floor. This instantly clears the bottom of the cabinet and creates a second level of storage beneath the hanging bottles for smaller items.
Inside the shower enclosure: A second tension rod installed at the back of the shower, above the existing curtain rail, provides a hanging point for an additional caddy, a mesh bag for children’s bath toys, or a second set of hooks for loofahs and face cloths. It uses vertical space inside the shower that would otherwise be completely empty.
Between walls in a narrow alcove: If your bathroom has a narrow alcove — common beside or above toilet cisterns in older properties — a tension rod installed across the width of the alcove creates an instant hanging rail for small baskets, hooks, or lightweight storage.
Frequently Asked Questions
How can I make my small bathroom look bigger on a budget?
The highest-impact, lowest-cost changes are a larger mirror, a clear shower curtain, and a complete declutter of the vanity surface. All three can be implemented for under $50 combined and require no tools or installation. Together they address the three main causes of perceived smallness — blocked sightlines, visual clutter, and insufficient reflected light — more effectively than most renovation interventions.
What colors make a small bathroom look bigger?
Light, monochromatic colour schemes create the greatest sense of space in a small bathroom. White, soft cream, and pale grey are the most effective individual colours because they reflect the most light. The key principle is not the specific colour but the consistency — a single colour family used across towels, accessories, shower curtain, and visible surfaces eliminates the visual fragmentation that makes small rooms feel cramped.
Can I add storage to a small bathroom without drilling?
Yes — several effective storage solutions require no drilling whatsoever. Freestanding over-toilet storage towers, tension pole shelving systems, over-door hanging organisers, tension rods under the sink, and magnetic strips on the side of a metal cabinet all provide meaningful storage capacity without any wall attachment. The key is to focus on vertical storage solutions that move items off the floor and out of the sightline rather than horizontal ones that spread across surfaces.
Does a large mirror really make a bathroom look bigger?
Yes, and it is the single most effective non-structural intervention available in a small bathroom. A large mirror — one that spans most of the wall above the vanity — doubles the perceived depth of the room by reflecting the space back on itself. The eye reads the reflected space as real space, making the bathroom appear to extend beyond its actual dimensions. The larger the mirror relative to the wall it occupies, the stronger this depth illusion becomes.
Final Thoughts
A small bathroom does not require a renovation to feel larger. It requires an understanding of why it currently feels small — clutter, blocked sightlines, poor lighting, and visual fragmentation — and a systematic approach to addressing each of those causes with non-structural interventions.
Start with the mirror and the shower curtain for an immediate visible difference. Follow with the vanity declutter and the lighting upgrade for the changes that will have the most sustained impact on how the room feels day to day. Add the vertical storage solutions and the monochromatic palette to complete the transformation.
None of these changes require permission, significant budget, or specialist skills. They require only the willingness to approach a small space as a design challenge rather than an architectural limitation — and the recognition that the most effective bathroom transformations are often the ones that remove things rather than add them.