
Welcome to the vibrant world of embroidery floss storage, where creativity meets organization!
Every stitch enthusiast knows that having a tidy craft space can spark inspiration and make the crafting process much more enjoyable.
In this listicle, we’ll explore 16 fantastic ways to store your embroidery floss, ensuring that your colors are always within reach and your crafting area stays neat and appealing.
Insider Tips for Embroidery Floss Storage
Imagine your crafting space transformed into an organized haven, where embroidery floss is neatly stored, easily accessible, and displayed with creative flair, making every project a breeze. These budget-friendly hacks will revolutionize your storage, perfect for small or large craft areas, blending functionality with artistic charm.
- Plastic Bobbin Cards in a Box: Wind floss onto plastic bobbins and store them in a clear tackle box with labeled dividers for easy color sorting. It’s like your floss is filed in a vibrant library.
- Clothespin Wall Display: Attach wooden clothespins to a board or string to clip floss skeins, creating a colorful, space-saving wall art piece. It feels like your craft room’s showcasing a textile gallery.
- Repurposed Spice Rack: Use a thrifted spice rack to hold small floss bundles in jars, spinning for quick access with a rustic vibe. It’s like your floss is stored in a cozy kitchen-inspired nook.
- Hanging Mason Jar Organizer: Screw mason jar lids under a shelf, filling jars with floss for a quirky, accessible storage solution. It’s like your craft space is bottling up creative magic.
- Embroidery Hoop Hanger: Thread floss skeins through a small embroidery hoop hung on the wall, blending craft with decor. It feels like your floss is framed in artistic simplicity.
- Magnetic Strip for Needles: Attach a magnetic strip to store needles or small floss spools, keeping them secure and within reach. It’s like your craft area’s sticking to clever efficiency.
- Woven Basket Drawers: Place small woven baskets in a drawer unit to sort floss by color or project, adding boho charm to hidden storage. It’s like your floss is nestled in a cozy, organized weave.
Whether you’re a seasoned pro or just starting out, these ideas will help you organize your craft room with style and functionality, turning your supplies into beautiful decor pieces.
Drawer Organization Delight

Image Credit: etsy
Imagine opening a drawer and being greeted by a rainbow of neatly organized embroidery floss! This method is not only practical but also visually stunning.
Using divided trays or boxes within your drawer allows for easy access and quick identification of colors. Consider labeling sections for different shades or types of floss to make finding your favorites a breeze.
– Benefits: Keeps your floss tangle-free and visible.
– Tip: Use clear containers to enjoy the view!
– Trick: Arrange by color gradient for a visually pleasing effect.
This storage method transforms a mundane drawer into a colorful haven that inspires creativity every time you open it.
Portable Plastic Solutions

Image Credit: kmsboutique
For those who love to craft on the go, portable plastic storage cases are a dream come true! These handy boxes can hold a variety of floss colors while being lightweight and easy to transport.
Each compartment can be labeled for quick access, meaning you can easily grab your supplies and head to a friend’s house or a crafting event.
– Unique Insight: Look for cases with removable dividers to customize your storage space.
– Suggestion: Choose a box that fits comfortably in your bag for hassle-free crafting.
– Issue: Ensure the box closes securely to avoid spills!
With a portable case, your creativity knows no bounds!
Crafting on the go? With portable plastic storage, you can bring your embroidery floss anywhere! Stay organized, label your compartments, and let your creativity travel with you.
Wooden Spool Racks

Image Credit: Walmart
Nothing says classic charm quite like a wooden spool rack to display your embroidery floss! These racks not only organize your threads but also serve as beautiful decor pieces.
You can easily see all your colors while adding a rustic touch to your craft room.
– Tip: Paint or stain the rack to match your room’s aesthetic.
– Trick: Use small hooks or clips to keep the floss from unwinding.
This method combines functionality with style, making it a favorite among crafters.
Transform your craft room with a wooden spool rack – where organization meets rustic charm! Keep your embroidery floss untangled and beautifully displayed, turning creativity into art.
Bunny Cardboard Wraps

Image Credit: paperlilie
Add a splash of fun to your embroidery storage with adorable bunny cardboard wraps! This DIY project not only keeps your floss organized but also brings a smile to your face.
Simply wrap your floss around cut-out bunnies and display them in a jar or box.
– DIY Ideas: Use patterned paper for a unique look.
– Suggestion: Create a themed collection for holidays or seasons.
– Tip: Involve kids in making these cute wraps for a family craft day!
This playful storage method is perfect for adding a touch of whimsy to your craft room.
Cardboard Box with Pegs

Image Credit: PinterestAccountBrandName
Transform a simple cardboard box into a creative storage solution with pegs to hold your embroidery floss! By simply attaching wooden or plastic pegs to the box lid, you can hang your threads neatly and prevent tangles.
– Tip: Use a sturdy box that can handle the weight of multiple spools.
– Unique Insight: This method allows you to display colors in an eye-catching way!
– Suggestion: Label each peg for easy identification.
This storage idea is both practical and a great way to recycle materials.
Wall-Mounted Displays

Image Credit: xinam
Why keep your embroidery floss tucked away when you can display it on the wall? Wall-mounted organizers let you showcase your colorful threads while keeping them accessible.
This method also frees up counter space and adds a decorative element to your craft room.
– Tip: Use decorative hooks or pegs that match your decor.
– Trick: Arrange colors in a gradient for a stunning visual effect.
– Suggestion: Consider adding a small shelf for tools and other supplies.
This approach turns storage into art, making your craft area truly unique.
Clear Drawer Organizers

Image Credit: lisa4118
Clear drawer organizers are perfect for those who love seeing all their options at a glance! These stackable trays can be customized to fit any drawer size, making them a versatile choice.
– Tip: Sort floss by brand or color for easy access.
– Suggestion: Use one tray for frequently used colors and another for seasonal shades.
The clear design allows you to spot the color you need quickly, keeping your crafting process smooth and enjoyable.
Mason Jar Magic

Image Credit: anitachoudhury
Mason jars are not just for preserves; they’re also a delightful way to store embroidery floss! These jars add a rustic charm to your craft room while keeping your threads visible and tangle-free.
– Tip: Use different jar sizes for various lengths of floss.
– Trick: Label jars with color codes for quick identification.
This storage solution combines functionality with a touch of nostalgia, perfect for any crafting enthusiast.
Color-Coded Boxes

Image Credit: kiniwoman
Color-coded storage boxes are a game-changer for organizing embroidery floss! By assigning a specific box for each color family, you’ll never have to dig through a tangled mess again.
– Tip: Use clear bins to easily see the contents.
– Suggestion: Label each box for quick access.
– Trick: Group similar shades together for a cohesive look.
This method adds a pop of color to your craft room while keeping everything tidy.
Spool Holder Carousel

Image Credit: bozhena44
A spool holder carousel is a fun and practical way to store your embroidery floss! This rotating organizer allows easy access to all your colors while keeping them neatly displayed.
– Tip: Choose a carousel with adjustable compartments for different spool sizes.
– Suggestion: Use it as a centerpiece in your craft room for added flair.
This method makes it simple to organize and showcase your beloved threads.
Latest Posts
- Tiny Parisian Apartment Ideas That Maximize French Charm
- French Apartment Interior Ideas That Embody Effortless Elegance

- Parisian Apartment Aesthetic Ideas That Capture French Elegance

- Small Apartment Organization Ideas That Transform Compact Living

- Studio Apartment Organization Ideas That Maximize Limited Space

- French Studio Apartment Ideas That Maximize Parisian Charm

DIY Floss Organizer

Image Credit: jenjenney
Get crafty with a DIY floss organizer made from materials you have at home! Whether it’s a shoe box or an old container, you can customize it to fit your needs.
– Tip: Decorate the container to match your craft room’s theme.
– Suggestion: Use dividers for better organization.
– Trick: Add a lid to prevent dust accumulation.
This personalized approach gives you a unique storage solution that reflects your style.
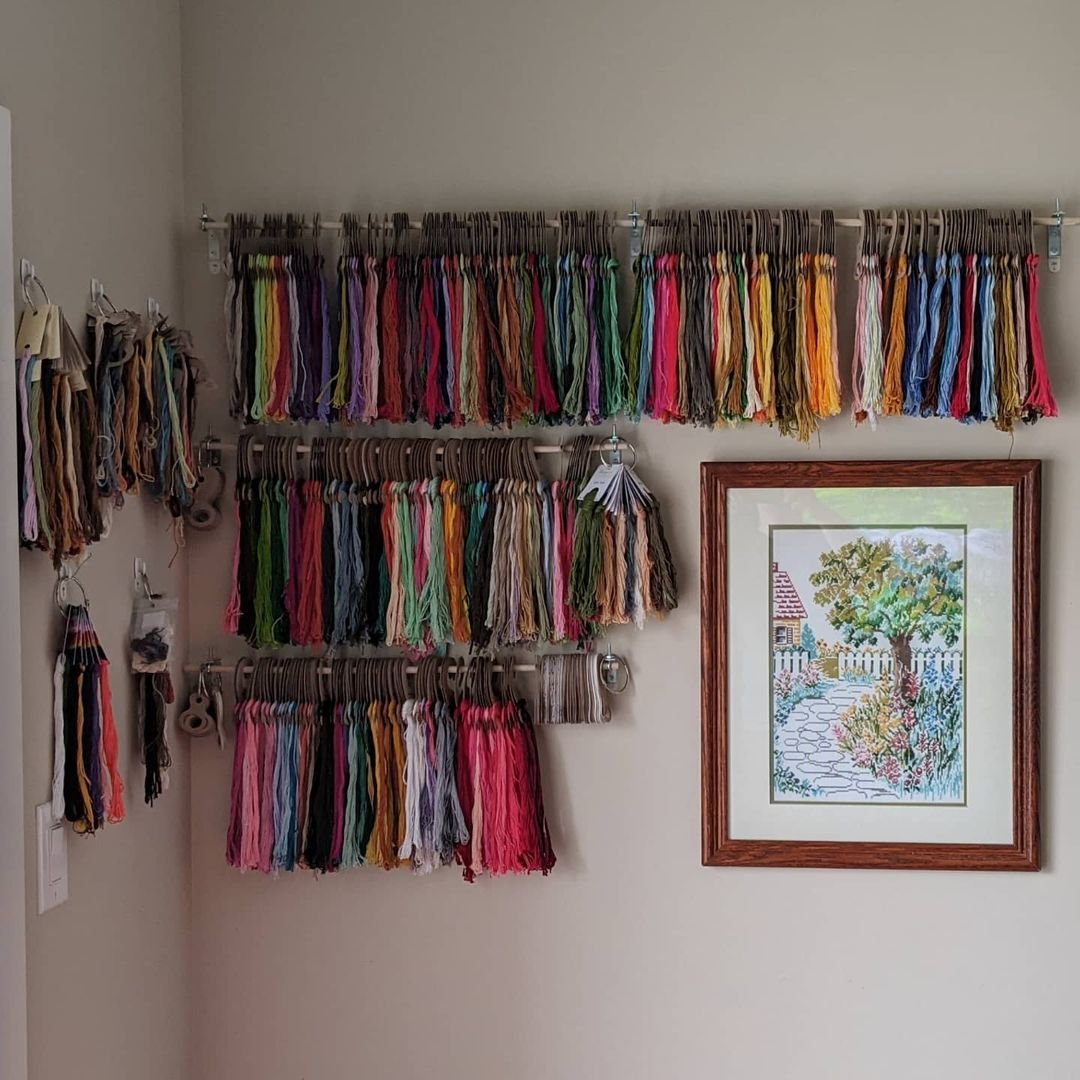
Hanging Floss Organizer

Image Credit: kelly_bownds
Turn your embroidery floss into a hanging art installation! Using a simple rod or dowel, hang your threads using clips or hooks.
– Tip: Choose a location that’s easy to reach.
– Suggestion: Arrange by color for a visually appealing display.
– Trick: Keep a small basket nearby for scissors and other tools.
This method saves space and adds a decorative touch to your craft room.
Transform your embroidery floss into a vibrant hanging display! It’s not just storage; it’s art that brings color and creativity to your craft room.
Thread Storage with Labels

Image Credit: iluvshabbychic
Keeping your embroidery floss organized is easy with labeled storage! Whether you use bins, boxes, or jars, adding labels ensures you always know where to find your favorite colors.
– Tip: Use a label maker for a polished look.
– Suggestion: Color-code labels to match the floss for quick identification.
– Trick: Keep a master list of colors for quick reference.
This method not only keeps your craft space tidy but also helps you stay organized during projects.
Final Touches with Thread Keepers

Image Credit: ktintherain
Thread keepers are a fantastic way to store your embroidery floss while keeping it tangle-free! These handy devices hold multiple strands securely, making it easy to transport your supplies.
– Tip: Use thread keepers with compartments for different colors.
– Suggestion: Label each compartment for easy access.
This method allows you to keep your threads organized while making it easy to grab and go!
Tangle-free threads are the secret to a smooth crafting experience! With thread keepers, you can effortlessly organize your embroidery floss and dive into your projects with ease.
Frequently Asked Questions
Q: What Are the Best Ways to Organize Embroidery Floss in a Craft Room?
A: Organizing your embroidery floss can be a fun way to keep your craft room tidy! Consider using divided trays or boxes to separate colors, or try clear drawer organizers for easy visibility. You can also utilize a spool holder carousel for a rotating display, making it both practical and visually appealing. Don’t forget to label your storage to find colors quickly!
Q: How Can I Store Embroidery Floss When Crafting on the Go?
A: If you love crafting on the go, portable plastic storage cases are your best friend! These lightweight boxes can hold various floss colors and are easy to transport. You can also use Mason jars for a cute and functional option, ensuring your threads stay visible and tangle-free as you move from place to place.
Q: What DIY Ideas Can I Use for Embroidery Floss Storage?
A: Get creative with your embroidery floss storage by trying some fun DIY projects! You can make bunny cardboard wraps for a whimsical touch or transform a simple cardboard box with pegs to hang your threads. Even a hanging floss organizer using a rod can turn your floss into an art piece while keeping it accessible!
Q: Are There Any Decorative Storage Options for Embroidery Floss?
A: Absolutely! You can use a wooden spool rack to display your embroidery floss charmingly, adding a rustic vibe to your craft room. Wall-mounted displays also allow you to showcase your colorful threads while keeping them within easy reach. Plus, using color-coded boxes not only organizes but also adds a lovely aesthetic to your space!
Q: What Should I Consider When Choosing an Embroidery Floss Storage Method?
A: When selecting an embroidery floss storage method, think about accessibility, visibility, and space efficiency. Choose solutions like clear drawer organizers or labelled containers for easy access and quick identification of colors. Consider your crafting habits; if you’re often on the move, opt for portable cases to keep your supplies organized wherever you go!
Conclusion
With these 16 creative embroidery floss storage ideas, your craft room can be both organized and visually stunning!
From portable cases to charming wall displays, there’s a solution for every style and need.
Which method will you try first? Share your thoughts and your own storage hacks in the comments below!