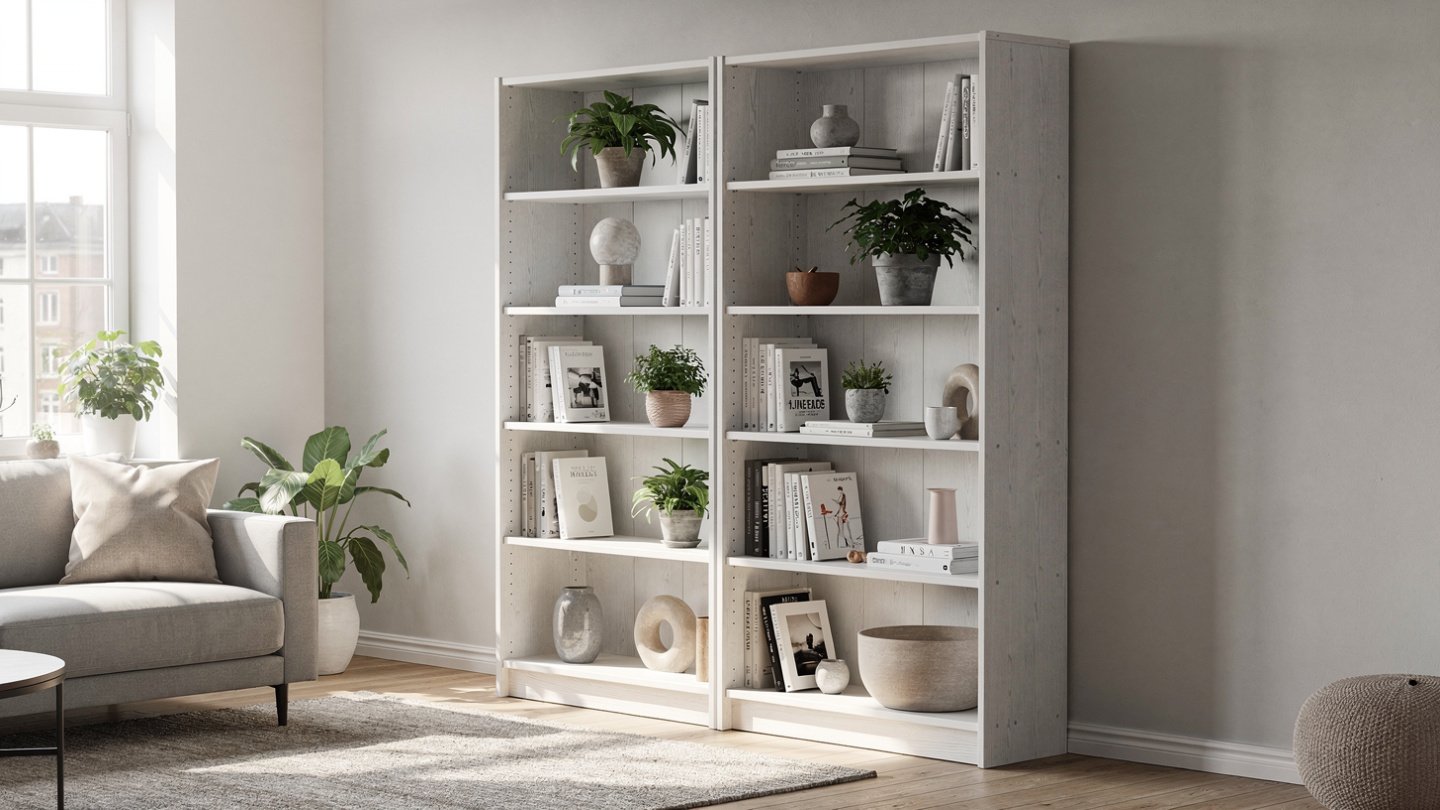
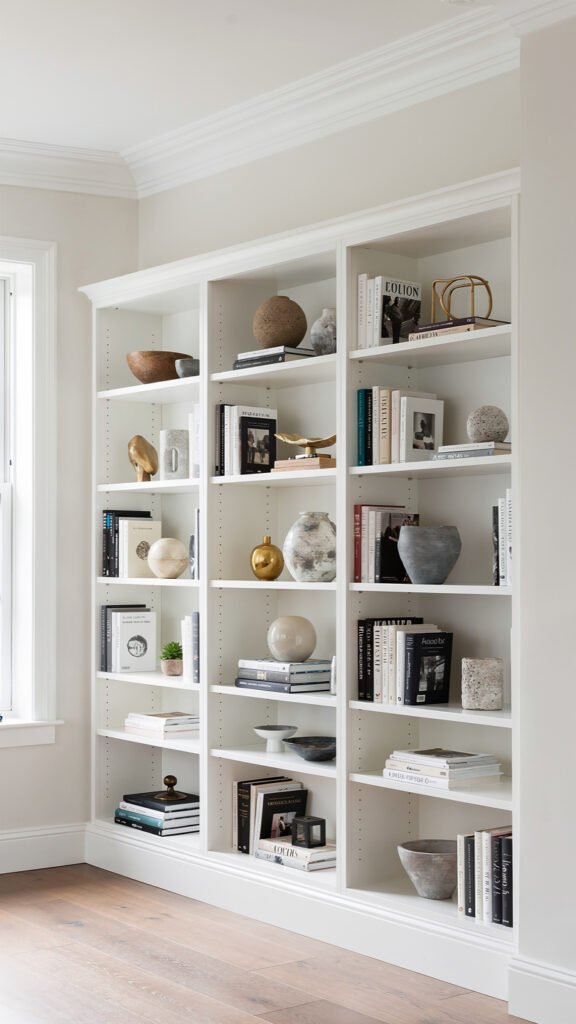
Professional built-in bookshelves cost between $3,000 and $15,000 depending on the size of the wall, the materials used, and the complexity of the installation. IKEA Billy bookcases cost between $60 and $100 each. After a proper hack — crown moulding at the top, a skirting board at the base, filler panels at the sides, and a coat of paint in the same colour as the walls — the visual difference between the two is, for most observers in most rooms, indistinguishable.
This is not an exaggeration. The Billy bookcase hack has become one of the most widely documented home improvement projects precisely because the results are so disproportionate to the cost and effort involved. A wall of built-in-looking bookshelves that would cost a carpenter $8,000 to build from scratch can be achieved with Billy bookcases, a few lengths of moulding, a tube of caulk, and a weekend of work for under $800 total — often considerably less.
This guide covers the complete process from beginning to end: what makes built-ins look built-in, the full materials list, how to plan the wall layout before buying anything, assembly and positioning, height extension to the ceiling, crown moulding installation, baseboard and filler panel addition, the painting process, and finally how to style the finished shelves. Work through the steps in order and the result will be a wall of bookshelves that looks like it was built into the house.
What Makes Built-Ins Look Built-In — The 4 Visual Secrets
Understanding why a standard IKEA Billy bookcase does not look built-in is the foundation of understanding what the hack needs to achieve. Out of the box, a Billy bookcase fails four specific visual tests that distinguish freestanding furniture from architectural built-ins. The hack fixes all four.
Secret 1: Built-ins reach the ceiling. A freestanding bookcase sits below the ceiling with a gap at the top — typically 12 to 24 inches of empty space between the top of the bookcase and the ceiling above. Built-in shelving runs from floor to ceiling with no gap. This full-height relationship with the room’s architecture is the single most important visual indicator that distinguishes a built-in from a piece of furniture. Extending the Billy to the ceiling — or filling the gap between the bookcase top and the ceiling — is the most impactful step in the entire hack.
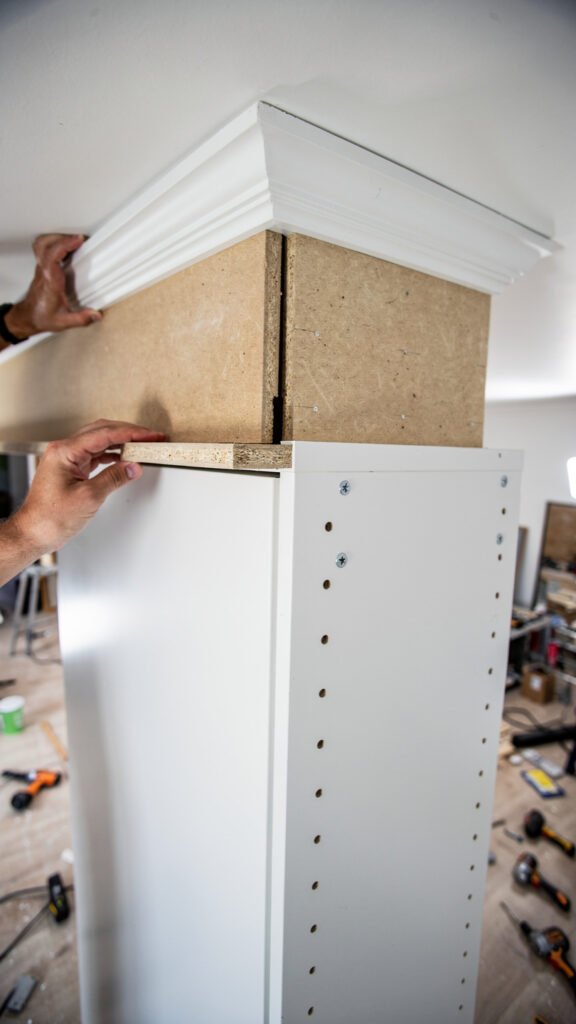
Secret 2: Built-ins have crown moulding at the top. Where the top of a built-in meets the ceiling, there is a cornice or crown moulding that creates a finished, architectural transition between the two surfaces. A freestanding bookcase has no such transition — the top panel simply ends. Adding crown moulding at the top of the Billy is what gives the finished hack its architectural quality and prevents it from reading as furniture that has been pushed against a wall.
Secret 3: Built-ins have a skirting board at the base. Built-in shelving sits on a plinth — a raised base — that visually connects the shelving to the floor and matches the skirting board profile of the room. Freestanding bookcases sit on visible legs or a simple base panel that looks nothing like a room’s skirting board. Adding a matching skirting profile at the base of the Billy is what grounds the unit architecturally and makes it read as part of the room’s structure rather than something placed within it.
Secret 4: Built-ins are painted the same colour as the walls. Freestanding bookcases are furniture — they have their own colour or finish, typically white, wood-effect, or black, which visually separates them from the walls around them. Built-in shelving is architecture — it is painted the same colour as the walls, which makes it recede into the room and look as if it grew out of the wall rather than being placed against it. Painting the entire unit — exterior, interior, mouldings, and all — in the same colour as the walls is the finishing step that completes the illusion.
What You Need: The Full Materials List
Before purchasing anything, complete the wall layout planning in the next section to determine how many bookcases you need and the precise lengths of moulding and filler material required. The list below covers the categories of materials needed for a standard Billy bookcase built-in hack.
- IKEA Billy bookcases — in the width or widths appropriate to your wall layout. Billy is available in 15.75-inch and 31.5-inch widths. The standard height is 79.5 inches.
- Crown moulding — enough linear footage to run across the full width of all bookcases plus mitred corners if the installation runs into a corner or return wall. Add 20% to your measured length to account for waste from mitring.
- MDF strips for filler panels — to fill any gaps between the bookcases and the side walls, and to create the extended height section between the bookcase top and the ceiling if not using add-on units.
- MDF skirting board strips — to match the profile of the room’s existing skirting and cover the base of the Billy units. Select an MDF skirting profile that matches or closely approximates the existing skirting in the room.
- Wood filler — for filling nail holes, gaps in moulding joins, and any surface imperfections before painting.
- Sandpaper — 120-grit for initial sanding and 220-grit for between paint coats. Sanding between coats is essential for a smooth, professional finish on the IKEA melamine surface.
- Shellac-based primer — essential for bonding to the IKEA melamine surface. Standard water-based primers do not adhere reliably to melamine. Shellac-based primer is the non-negotiable foundation for a paint finish that does not peel.
- Semi-gloss paint — in the same colour as the room’s walls, for the final finish coats. Semi-gloss is recommended over matt for built-in shelving because it is more durable and wipe-clean, and its slight sheen reads as a more architectural, intentional finish than a flat matt on shelving.
- Liquid nails construction adhesive — for attaching crown moulding, filler panels, and skirting strips to the bookcase surfaces. Liquid nails provides a strong, gap-filling bond that is more reliable than wood glue alone on the IKEA melamine surface.
- Finishing nails and a nail gun or hammer — for securing moulding and panels while the adhesive sets, and for any structural attachment points.
- Paintable caulk and a caulk gun — for sealing every join between the moulding and the ceiling, between the filler panels and the walls, and between the individual units. Caulking is the step that produces the seamless, painted finish that reads as built-in rather than assembled.
- Wall anchors and screws — for securing the bookcases to the wall for safety and stability, and for connecting adjacent units to each other.
Step 1 — Plan Your Wall Layout Before Buying the Bookcases

Planning the wall layout before purchasing anything is the step that most people skip and almost everyone regrets skipping. A Billy wall layout that has not been planned in advance almost always results in at least one of the following problems: gaps that are too large to fill elegantly, units that do not centre properly on the wall, or a layout that conflicts with a light switch, socket, or skirting board that was not accounted for.
Measure the wall precisely. Measure the total width of the wall from corner to corner, or from the nearest obstruction to obstruction on each side. Measure the ceiling height at several points across the wall — older rooms are rarely perfectly level, and a ceiling height variation of even half an inch affects how the crown moulding sits across the full width of the installation.
Calculate the Billy layout. Billy bookcases come in two primary widths: 15.75 inches and 31.5 inches. Using these two widths in combination, calculate how many units of each width fit across your wall with the smallest possible total gap. For example, a wall that is 120 inches wide might accommodate three 31.5-inch units and one 15.75-inch unit, for a total of 110.25 inches — leaving a gap of 9.75 inches to be filled with MDF filler panels on one or both sides.
Plan the filler panel positions. The remaining gap after the bookcases are positioned should be split between both sides of the installation where possible — half on the left, half on the right — to keep the layout visually centred on the wall. A single large filler panel on one side only tends to look like a planning error rather than an intentional design choice.
Note the positions of all fixed elements. Mark the positions of electrical sockets, light switches, radiators, and any fixed skirting board features that will affect the installation. Electrical sockets within the footprint of the bookcase installation need to be accessible — plan which unit positions they fall within and ensure the installation does not permanently block them.
Create a scaled drawing. A simple scale drawing on graph paper — one square representing six inches, for example — showing the wall width, the positions of all Billy units, the filler panel widths, and the positions of any fixed features takes 20 minutes and prevents hours of remedial work during installation.
Step 2 — Assemble and Position the Bookcases
Assemble each Billy bookcase according to the IKEA instructions with one important modification: do not attach the backing panel during initial assembly. The Billy backing panel — a thin sheet of fibreboard — will be attached after the bookcases are positioned against the wall, at which point you can assess whether the backing panel is needed at all. In many installations the wall itself serves as the back of the bookcase, and the backing panel is omitted entirely, which gives the shelves a cleaner, more genuinely built-in appearance.
Position each assembled bookcase against the wall in the planned layout. Check each unit for level — both vertically with a spirit level against the side panel, and horizontally across the top panel. Most floors are not perfectly level, and shimming under the base of a bookcase with thin wooden shims is the correct approach to achieving a level unit on an uneven floor. Do not attempt to compensate for an uneven floor by adjusting the shelves — level the units at the base and the shelves will take care of themselves.
Connect adjacent Billy units to each other using connecting hardware or screws driven through the side panels of adjoining units at the top, middle, and base positions. Connected units behave as a single structure rather than individual pieces of furniture, which is essential for both stability and for the seamless appearance of the finished installation. A connected row of Billy bookcases that is also secured to the wall at the top will not tip, shift, or separate during use.
Secure each unit to the wall using the wall anchor method appropriate to your wall type — toggle anchors for plasterboard walls, masonry anchors for brick or block walls. The anchor point should be through the top rear rail of the bookcase into a wall stud or anchor point. This step is not optional — an unsecured row of Billy bookcases, particularly when filled with books, represents a significant tipping hazard.
Step 3 — Extend the Height to the Ceiling
Extending the Billy to the ceiling is the single most impactful step in the entire hack. It is also the step with the most variation in approach depending on the gap between the top of the bookcase and the ceiling. Two methods cover the full range of gap sizes encountered in most rooms.
Option A: IKEA GNEDBY or Billy Add-On Units
IKEA produces add-on units specifically designed to stack on top of the standard Billy bookcase — the GNEDBY open shelf unit and the Billy add-on unit with or without doors. These units are designed to sit directly on top of the standard Billy and provide an additional 13.75 inches of height. In rooms with ceiling heights of approximately 93 to 95 inches, a standard Billy plus one add-on unit will reach close enough to the ceiling that a small MDF extension box and crown moulding can bridge the remaining gap.
This is the cleaner and more structurally sound approach where it is achievable. The add-on units are purpose-built to connect with the standard Billy and provide a stable, flush extension without requiring custom carpentry.
Option B: Custom MDF Extension Boxes
Where the gap between the top of the Billy and the ceiling is too large for add-on units to bridge practically — or where add-on units are not available — a simple MDF box built to fit the exact gap provides the extension. The box is constructed from MDF cut to the same width as the bookcase, the exact height of the gap, and a depth that matches the bookcase depth. It sits on top of the bookcase and is secured with liquid nails and finishing nails. The interior of the box can be left open as a display shelf or fitted with an MDF panel as a closed cabinet, depending on preference.
This approach requires basic woodworking — cutting MDF to size and assembling a simple rectangular box — but no specialist skills. Most timber merchants and large hardware retailers will cut MDF to specific dimensions for a small fee, eliminating the need for any power tools beyond a drill.
Step 4 — Add the Crown Moulding at the Top
Crown moulding is the detail that most clearly separates the finished Billy hack from a row of bookcases pushed against a wall. It creates the architectural transition between the top of the bookcase installation and the ceiling that is the defining visual characteristic of genuine built-in shelving. It is also the most technically demanding step in the process — not because the skills required are advanced, but because cutting crown moulding accurately requires patience and careful measurement.
Cutting crown moulding at 45-degree angles. Crown moulding that runs along a straight wall requires 45-degree mitred cuts at each end where it meets a return piece or a wall. A mitre saw set to 45 degrees makes these cuts straightforward. If you do not have access to a mitre saw, a manual mitre box — a plastic or wooden guide that holds the saw at the correct angle — is an inexpensive alternative that produces accurate results with practice. Cut the moulding slightly long initially and trim to exact length — it is far easier to trim a piece that is slightly long than to fill a gap created by a piece that is slightly short.
Attaching the crown moulding. Apply a continuous bead of liquid nails construction adhesive to the back face of the crown moulding, press it firmly into position against the top of the bookcase installation and the ceiling, and secure it with finishing nails driven through the moulding into the top panel of the bookcase below. Hold the moulding in position for the adhesive contact time specified on the product — typically 30 to 60 seconds — before releasing.
Filling joins and gaps with paintable caulk. Once the crown moulding is attached and the adhesive has cured, run a bead of paintable caulk along the join between the moulding and the ceiling, along the join between the moulding and the bookcase top, and across any mitred corner joins. Smooth the caulk with a damp finger, allow it to dry, and sand lightly if needed before painting. This caulking step is what produces the seamless, monolithic appearance of the finished crown moulding — without it, the joins between the moulding and the adjacent surfaces remain visible through the paint and give the installation away as assembled rather than built.
Step 5 — Add the Baseboard and Filler Panels
The baseboard and filler panels address the two remaining visual tells of a freestanding bookcase installation: the visible base structure of the Billy units, and the gaps between the bookcase installation and the side walls.
The baseboard. The Billy bookcase base — the visible leg structure and lower panel beneath the lowest shelf — does not match the skirting board profile of any room. It reads immediately as furniture rather than architecture. Covering it with an MDF skirting strip that matches the room’s existing skirting profile is the fix. Cut MDF skirting to the full width of the bookcase installation, apply liquid nails to the back face, press it against the front face of the Billy base structure, and secure with finishing nails. Where the installation meets a side wall, cut the skirting at a 45-degree mitre to join with the room’s existing skirting board as neatly as possible.
The filler panels. Any gap between the bookcase installation and the side walls — the calculated filler panel width from the layout planning step — is covered with MDF panels cut to the exact width of the gap, the full height from floor to ceiling, and the same depth as the bookcase. These panels are attached to the side of the outermost bookcase with liquid nails and finishing nails, and to the wall with construction adhesive or appropriate wall fixings. Once painted, they appear to be part of the bookcase structure rather than gap-fillers.
Caulk every join. Run paintable caulk along every join in the installation: between filler panels and walls, between filler panels and bookcases, between the baseboard and the floor, between the baseboard and the bookcase front, and between any two adjacent MDF surfaces. Caulk every join regardless of how small the gap appears. The paint finish will amplify any gap that has not been filled and caulked — a 1mm gap in bare MDF becomes a 3mm shadow line under paint. Caulking is the preparation step that most directly determines the quality of the finished result.
Step 6 — The Painting Process That Makes It Look Truly Built-In

The painting process for an IKEA Billy bookcase hack differs from standard interior painting in one critical respect: the IKEA melamine surface does not accept standard paint primers. A primer applied directly to the melamine surface without the correct bonding agent will appear to adhere initially and then peel, flake, or chip under normal use within weeks or months. The shellac-based primer step is the non-negotiable technical requirement that prevents this failure.
Step 1: Clean all surfaces thoroughly. Wipe all surfaces of the assembled and fully caulked installation with a damp cloth to remove dust, grease, and any fingerprints. Allow to dry completely before priming. Any contamination on the melamine surface will prevent the primer from bonding correctly.
Step 2: Apply shellac-based primer to all surfaces. Using a brush for detail areas and a small roller for flat panels, apply a coat of shellac-based primer — such as Zinsser BIN or an equivalent — to every surface of the installation: the melamine bookcase panels, the MDF filler panels, the crown moulding, and the baseboard. Shellac-based primer bonds chemically to melamine surfaces in a way that water-based primers cannot. It dries quickly — typically within 45 minutes — and provides the adhesion layer that all subsequent paint coats depend on.
Step 3: Sand lightly after the primer coat. Once the primer is fully dry, sand all surfaces lightly with 220-grit sandpaper. This scuffs the primer surface slightly, providing mechanical adhesion for the subsequent paint coats and levelling any brush marks or roller texture. Wipe down with a damp cloth after sanding to remove the sanding dust before applying paint.
Step 4: Apply two coats of semi-gloss paint in the wall colour. Apply the first coat of semi-gloss paint in the same colour as the room’s walls, working methodically across all surfaces of the installation. Allow to dry fully — a minimum of four hours for most water-based paints — then sand lightly with 220-grit sandpaper, wipe down, and apply the second coat. Two coats of semi-gloss over a properly primed surface will produce a durable, even finish that is indistinguishable from a painted MDF built-in.
Optional: Paint the interior of the shelves a slightly darker tone. Painting the interior back panel and interior side panels of the shelves one to two shades darker than the exterior — a slightly deeper version of the wall colour rather than a contrasting colour — adds visual depth to the shelves and makes the objects displayed on them stand out more clearly. This is a finishing detail used by professional interior designers that adds a subtle but meaningful quality to the finished installation.
Step 7 — Styling the Finished Bookcase Like a Designer
A beautifully built and painted Billy hack can be undermined entirely by poor shelf styling. Conversely, thoughtful shelf styling can make even an imperfect installation look considered and intentional. The following principles consistently produce shelf arrangements that look designed rather than simply filled.
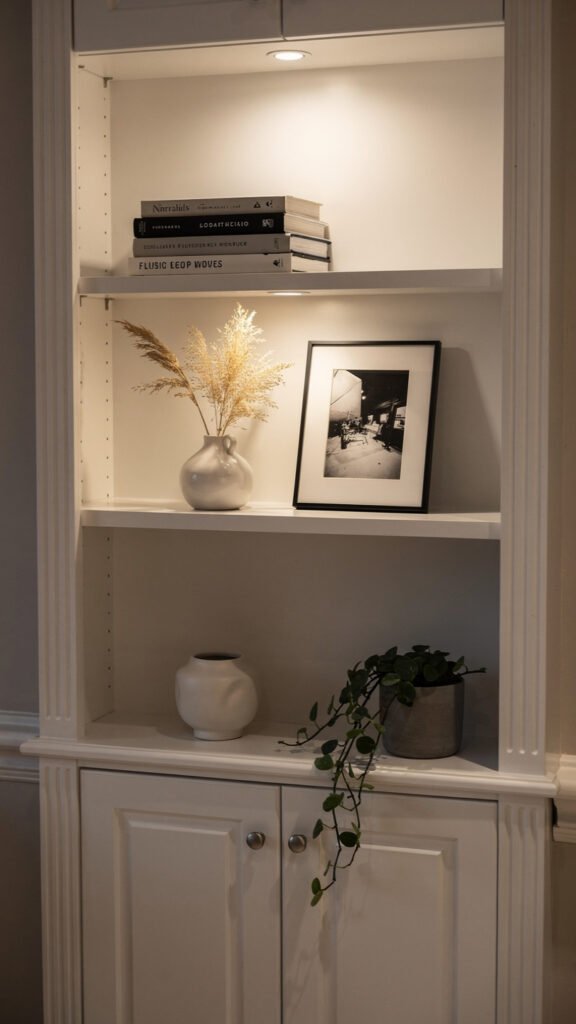
Apply the rule of three. Objects arranged in groups of three are more visually pleasing than objects arranged in pairs or in large groups. On each shelf, aim to create compositions of three elements — a book stack, an object, and a plant, for example — rather than filling the shelf continuously from left to right with books or lining up a row of identical objects.
Mix orientations for books. A shelf filled entirely with vertically standing books looks like a library rather than a designed interior. Mix vertical books — spines out — with one or two horizontal stacks of two or three books at each end or centre of a shelf. The horizontal stacks provide a surface for placing small objects on top of them, which adds the layered quality that distinguishes designed shelves from simply filled ones.
Include plants on at least two shelves. A small trailing plant or a compact potted plant on a shelf introduces organic texture and natural colour that no manufactured object can replicate. Place one plant on a shelf where it can trail slightly over the shelf edge — this softens the rectilinear geometry of the shelving and makes the installation feel alive rather than static.
Leave breathing room on every shelf. The temptation with a new wall of shelving is to fill every available inch. Resist it. Shelves that have 20 to 30% of their surface left clear read as curated and intentional. Shelves filled to capacity read as storage rather than design. The empty space is not wasted — it is what allows the objects that are present to be seen and appreciated.
Limit your colour palette across the shelves. Books, objects, and plants across a full wall of shelving can quickly become visually chaotic if the colours are not edited. Choose two or three colours to be dominant across the shelves — warm neutrals, a single accent colour, and natural green from plants, for example — and remove or relocate any object that falls significantly outside this palette. Consistent colour across the shelving is what gives the installation the cohesion that reads as an interior design decision rather than an accumulation of possessions.
Frequently Asked Questions
How many IKEA Billy bookcases do I need for a wall?
The number of Billy bookcases needed depends on the width of the wall and the Billy widths you choose to use. Measure the wall width in inches and divide by the Billy width — 31.5 inches for the standard wide unit, 15.75 inches for the narrow unit — to find the approximate number of units needed. The remaining gap after the bookcases are positioned is covered with MDF filler panels. A scaled drawing of the wall with the units laid out before purchasing will give you the exact count and filler panel widths needed.
Can you attach IKEA Billy to the wall?
Yes — and for safety reasons, you should. IKEA includes wall anchoring hardware with Billy bookcases for this purpose. The anchoring point is typically through the top rear rail of the bookcase into a wall stud or wall anchor. In the context of a built-in hack, the bookcases are additionally stabilised by being connected to each other across the row, by the crown moulding above, and by the filler panels at the sides — all of which add structural stability beyond the standard wall anchoring.
How do I make IKEA Billy reach the ceiling?
Two approaches work depending on the gap between the top of the Billy and the ceiling. If the gap is approximately 13 to 15 inches, an IKEA Billy add-on unit or GNEDBY unit stacked on top of the standard Billy will reach close enough to the ceiling that crown moulding bridges the remainder. If the gap is a non-standard size — either larger or smaller than an add-on unit accommodates — a custom MDF extension box built to the exact dimensions of the gap provides the height extension. In both cases, crown moulding installed between the top of the extension and the ceiling creates the finished architectural transition.
What paint should I use on IKEA Billy bookcases?
The correct painting sequence for IKEA Billy bookcases is: shellac-based primer first — Zinsser BIN or equivalent — applied directly to the melamine surface, followed by semi-gloss paint in the desired colour. The shellac-based primer is not optional — standard water-based primers do not bond reliably to melamine and will result in peeling. Semi-gloss paint is recommended over matt for the topcoat because it is more durable, more wipe-clean, and reads as more architectural in a built-in context.
Final Thoughts
The IKEA Billy bookcase built-in hack is one of the most consistently rewarding home improvement projects available to anyone who wants the look of custom built-in shelving without the budget that custom built-ins require. The four visual secrets — ceiling height, crown moulding, a matching baseboard, and a unified paint colour — are achievable with widely available materials, basic tools, and a methodical approach to a process that spans one to two weekends of work.
Follow the steps in order. Do not skip the planning stage. Do not skip the shellac primer. Caulk every join before painting. Apply two full paint coats. And resist the urge to fill every shelf when the installation is complete — the restraint in styling is what separates a wall of storage from a wall of design.
The result will be a room feature that most visitors will assume was built into the house — and that is precisely the point.