
You bought a Blackstone griddle thinking you’d just set it on your patio table and call it good. But now you’re realizing you need somewhere to prep food, store propane, keep utensils handy, and maybe add a sink or fridge. Standing at a griddle on a wobbly table while running back and forth to your kitchen isn’t the outdoor cooking dream you had in mind.
A proper Blackstone setup transforms your griddle from a standalone appliance into an actual outdoor kitchen. The right configuration gives you workspace, storage, and functionality making outdoor cooking as convenient as your indoor kitchen. You stop feeling like you’re camping and start actually enjoying the process.
I’m covering everything from simple cart setups and built-in islands to full outdoor kitchen builds with your Blackstone as the centerpiece. You’ll see budget-friendly DIY options, pre-made solutions, what features matter most, and how to plan layouts that actually work. These ideas range from weekend projects to serious investments, all focused on making your Blackstone more functional and your outdoor cooking more enjoyable.
What Makes Blackstone Outdoor Kitchens Work
Counter Space Saves Sanity: Having prep area beside your griddle eliminates the constant trips inside for ingredients and plated food. It’s like having a sous chef where workspace prevents chaos. The adjacent surfaces make cooking flow smoothly.
Storage Keeps Essentials Close: Cabinets or shelves storing propane, tools, seasonings, and cleaning supplies right where you cook eliminate hunting for stuff mid-cook. It’s like having everything in arm’s reach where convenience determines success. The nearby storage prevents workflow interruptions.
Weather Protection Matters: Covers, overhangs, or storage protecting your Blackstone from elements extend its life significantly. It’s like garaging your car where protection prevents deterioration. The weather consideration keeps equipment functioning longer.
Utilities Add Capability: Adding electrical outlets, lighting, water access, or gas lines transforms basic setups into fully functional cooking spaces. It’s like infrastructure where utilities enable possibilities. The service additions make outdoor cooking genuinely convenient.
Blackstone Outdoor Kitchen Ideas That Take Your Cooking Outside
Build your perfect outdoor cooking setup with these Blackstone outdoor kitchen ideas featuring practical configurations.
Simple Rolling Cart Setup
Start with a commercial-grade rolling cart positioning your Blackstone at comfortable cooking height with storage underneath. The mobile solution lets you move your setup around or store it when not in use. It’s like portable kitchen where flexibility beats permanent installation.
Choose carts with locking wheels, at least one shelf below, and side hooks for utensils. Add a small side table for additional prep space. This Blackstone outdoor kitchen approach works great for renters or people testing outdoor cooking before committing to built-ins.
DIY Cinder Block Island
Build a simple island using cinder blocks and wood creating a permanent Blackstone station with storage. The blocks stack creating the structure while wood tops provide work surfaces. It’s like adult Legos where basic materials create functional furniture.
Stack blocks to comfortable height—typically 36 inches—leaving openings for storage shelves. Top with pressure-treated plywood or butcher block. This Blackstone outdoor kitchen project costs under $300 and completes in a weekend providing solid permanent setup.
Pre-Fab Outdoor Kitchen Island
Install a pre-fabricated outdoor kitchen island designed to accommodate griddles with built-in storage and counter space. The ready-made units provide professional looks without custom construction. It’s like plug-and-play where someone else handled the planning.
Look for islands with cutouts sized for your specific Blackstone model or adjustable openings. Many include propane storage, side burners, and weatherproof cabinets. This Blackstone outdoor kitchen solution delivers finished results faster than DIY builds.
Built-In Stone or Brick Surround
Create a permanent built-in setup surrounding your Blackstone with stone, brick, or stucco matching your home’s exterior. The integrated design makes the griddle feel like intentional architecture rather than added appliance. It’s like custom cabinetry where everything looks cohesive.
Include prep counters on both sides, storage below, and overhead lighting. Use weather-resistant materials throughout. This Blackstone outdoor kitchen investment creates resort-style cooking spaces adding serious property value.
L-Shaped Configuration
Design an L-shaped layout with your Blackstone on one leg and additional features like sink, fridge, or prep area on the other. The corner design maximizes space while creating distinct zones. It’s like kitchen triangles where layout affects efficiency.
Position the Blackstone at the corner or one end depending on your space and workflow preferences. The L-shape works great along two sides of a patio or deck. This Blackstone outdoor kitchen layout provides maximum functionality in moderate space.
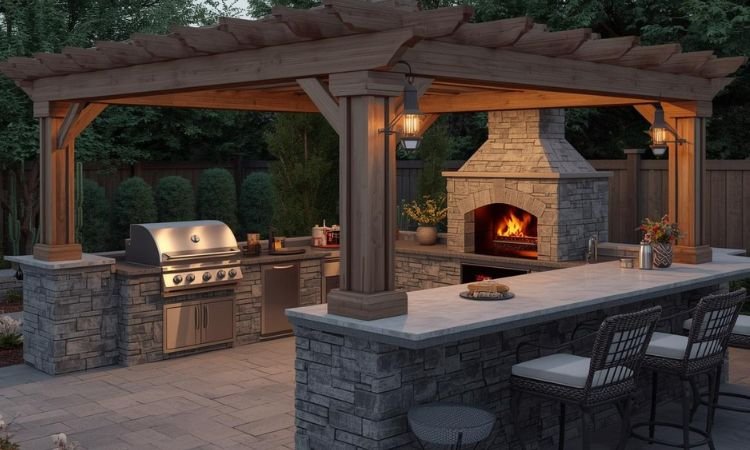
Covered Pavilion Setup
Install your Blackstone under a covered pavilion or pergola protecting it from weather while creating defined outdoor cooking area. The overhead cover lets you cook in light rain and provides shade in summer. It’s like having a roof where protection extends usability.
Add curtains or roll-down shades for wind protection and privacy. Include overhead lighting and ceiling fan for comfort. This Blackstone outdoor kitchen arrangement extends your cooking season significantly.
Folding Side Tables Addition
Attach folding side tables to your Blackstone or adjacent surfaces creating flexible prep space that stows when not needed. The hinged tables provide workspace without permanent footprint. It’s like Murphy beds where space appears when needed.
Use weather-resistant materials and sturdy hardware supporting food weight. The tables fold down against walls or the griddle cart. This Blackstone outdoor kitchen hack works great in tight spaces where permanent counters won’t fit.
Full Outdoor Kitchen Integration
Incorporate your Blackstone into a complete outdoor kitchen including sink, refrigerator, storage, and possibly other cooking appliances. The comprehensive setup rivals indoor kitchens for functionality. It’s like going all-in where outdoor becomes equal to indoor.
Plan for plumbing, electrical, and gas lines during construction. Include adequate lighting, ventilation if covered, and plenty of counter space. This Blackstone outdoor kitchen approach creates entertaining spaces that genuinely reduce indoor kitchen use.
Raised Deck Platform
Build a dedicated deck platform elevating your Blackstone area creating defined cooking zone separate from main patio. The raised section establishes the cooking space as special destination. It’s like staging where elevation creates hierarchy.
Include built-in seating around the perimeter letting guests watch cooking. Add railings with shelves or hooks for tools. This Blackstone outdoor kitchen design works great for sloped yards or multi-level outdoor spaces.
Modified Grill Island Conversion
Convert an existing built-in grill island to accommodate your Blackstone by replacing or modifying the grill section. The retrofit approach uses existing infrastructure saving construction costs. It’s like renovation where you work with what’s there.
Remove the old grill and modify the opening to fit your Blackstone dimensions. Adjust height if needed using shims or cutting. This Blackstone outdoor kitchen solution gives new life to unused grill islands.
Mobile Prep Station Combo
Combine your Blackstone cart with a separate rolling prep station creating a modular kitchen that moves together or separately as needed. The two-piece system provides flexibility while maintaining full functionality. It’s like modular furniture where pieces work together or apart.
Use matching carts for cohesive looks. One holds the Blackstone, the other provides prep surface, storage, and maybe a mini fridge. This Blackstone outdoor kitchen approach adapts to different entertaining needs and spaces.
Making Your Blackstone Setup Work Long-Term
Plan For Grease Management: Include grease trap access, easy-clean surfaces, and proper disposal systems preventing mess and fire hazards. It’s like plumbing where waste management determines success. The thought-out grease handling keeps everything cleaner and safer.
Include Adequate Lighting: Install task lighting over cooking and prep areas letting you use your setup after dark. It’s like workspace illumination where seeing clearly prevents mistakes. The proper lighting extends usable hours significantly.
Consider Wind Protection: Position your Blackstone with wind breaks or add screens preventing flame blowout and uneven heating. It’s like shelter where protection improves performance. The wind consideration maintains consistent cooking temperatures.
Add Weatherproof Storage: Use marine-grade or outdoor-rated cabinets and covers protecting equipment from moisture and temperature swings. It’s like waterproofing where protection prevents rust and deterioration. The weather-resistant choices extend equipment life.
Frequently Asked Questions About Blackstone Outdoor Kitchens
How Much Does A Blackstone Outdoor Kitchen Cost?
Basic DIY setups using carts and simple structures run $500-1,500 including materials and accessories. Mid-range builds with pre-fab islands or cinder block construction cost $2,000-5,000 depending on features. Full custom built-in outdoor kitchens with Blackstone as centerpiece run $8,000-25,000 or more including appliances, utilities, and professional installation.
The Blackstone itself costs $200-600 depending on size, then you’re adding infrastructure around it. Simple rolling cart setups offer the cheapest entry while permanent built-ins with utilities require significant investment. Your actual costs depend heavily on DIY versus professional installation, material choices, and how many features you include beyond basic cooking surface.
What Size Blackstone Works Best For Outdoor Kitchens?
The 36-inch Blackstone offers the best balance for most outdoor kitchen setups providing ample cooking surface without dominating your space. It feeds 8-10 people comfortably and fits standard 42-inch island cutouts. The 28-inch model works for smaller spaces or couples while the 22-inch suits tight areas or secondary cooking stations.
Consider your typical group size and available space. Bigger isn’t always better if it leaves you with no prep counter space. The 36-inch dominates most builds because it handles parties without being unmanageable for regular family meals. Measure your planned space carefully—you need at least 12 inches of clearance on sides for safety and workflow.
Do I Need Building Permits For A Blackstone Setup?
Simple setups using portable carts or freestanding furniture typically don’t require permits since they’re not permanent structures. Built-in installations often need permits especially if adding utilities like gas lines, plumbing, or electrical work. Permanent structures over certain sizes may require permits even without utilities depending on local codes.
Check with your local building department before starting permanent construction. Permit requirements vary widely by location and project scope. Running new gas lines almost always requires permits and licensed professionals. Skipping required permits causes problems when selling your home or if something goes wrong. The permit process typically costs $100-500 and ensures safe, code-compliant installation.
Can I Leave My Blackstone Outside Year-Round?
Blackstones can stay outside if properly protected but will last longer with indoor storage. Use a quality weatherproof cover when not in use and store propane separately. If leaving it outside permanently, build a cover or pavilion providing overhead protection from direct rain and sun. Regular seasoning and maintenance become more important for outdoor-stored griddles.
In harsh winter climates, bring your Blackstone inside or at minimum store it in a shed or garage. Extreme temperature swings and moisture accelerate rust and wear. Many people compromise by keeping the griddle outside during active cooking season and storing it inside during winter months. The extra effort significantly extends equipment life.
What Features Should I Include Besides The Griddle?
At minimum include prep counter space on at least one side—18-24 inches works for basic needs. Add storage below for propane, utensils, and seasonings. Consider a small sink for easy cleanup and a mini fridge keeping ingredients cold. Overhead lighting extends usable hours while electrical outlets power accessories.
Other valuable additions include trash/recycling bins, paper towel holders, utensil hooks, and spice racks. A side burner adds versatility for sauces or sides. Built-in cutting boards save counter space. Prioritize based on your budget and cooking style—you can always add features later. Start with basics that make cooking flow smoothly then enhance over time.
Creating Your Perfect Blackstone Cooking Space
Blackstone outdoor kitchen ideas prove that griddle cooking becomes infinitely better with proper setup and support. The smart configurations turn standalone appliances into functional cooking centers that actually rival indoor kitchens. I’ve found that people who invest in proper Blackstone setups use them constantly while those with basic arrangements gradually stop cooking outside.
Start by deciding on permanent versus portable based on your situation and commitment level. Plan for adequate prep space and storage making outdoor cooking genuinely convenient. Include utilities and weather protection if building permanently. The thoughtful approach creates outdoor cooking spaces you’ll actually use rather than equipment collecting dust.
What’s your current Blackstone setup and what would make it better? Share your outdoor kitchen plans below!